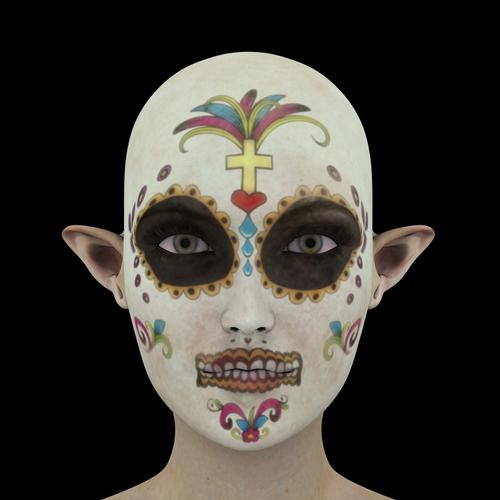
Facepainting tips
 Hellish-Abaddon
Posts: 0
I've been trying for a while to get a realistic facepaint effect and after trying everything I can think of this is the closest I got.
It's still not good enough though and I have no idea how to get the effect. I don't even know where to go from here or what my next step should be lol
Hopefully someone here has done something like this before and can give me some tips..


test.jpg
750 x 750 - 163K


Comments
I think it looks fine, but that's just my .02. What about it exactly are you trying to improve?
Also, love sugar skull type work.
Thanks.
Basically, I want the "little details" to come out a bit more. I may have to change to a different skin with a better bump to see what kind of results I get.
I also wanted to get a smearing or smudging look in some areas, sadly PS smudge tool isn't getting what I want so I may have to leave it, for now anyway.
I'll post back with some results soon...
Try NKS5. It's a free toolkit for Photoshop CS5+ that mimics real tools. The panel itself acts as hotkeys and alters the built-in PS settings, so everything it can do is already in PS, but this just sets up the combinations to get them right so you can fiddle less and paint more. It has some smudging and pushing tools that you may like. Some tools don't work on a locked background layer.
http://nkurence.com/blog/2012/06/nks5-natural-media-toolkit-for-photoshop-cs5-cs6/
The download button can be easily overlooked. It's under the 'article' but above the comments and looks like the donate button.
THAT is very nice set of tools. Install was a bit confusing, but after going to scripts-instalNKS5 everything works fine. Thanks for the link.
My main problem with the original image was that it didn't look like paint. After tweaking and rendering with a new set of lights I think I got what I was looking for.
Bumps are looking good and after tweaking specular a bit, it's got a nice shine to it.
I also managed to get a very nice "fade" around the edges.
I still might tweak it a bit more, but for the most part, I'm happy with it.
Wow. Very nice looking!
Very nice!
I intend to get to get some markings/tattoos on a skin/character at some point. I hope it turns out half as good as this..
Well, that escalated from "looks fine to me" to "omg, that is great !" rather quickly : - )
Great job !
Maybe I'm just being too hard on myself or maybe it's the lack of sleep, but there's still something not quite right. Something around the mouth... Maybe making the mouth paint a little wider would help.
Anyway, here's an update (Try to ignore the warped clothes and the weird thing with the hair lol)
I'm going to say it's probably the way you're doing the teeth. Most sugar skull makeup I've seen have them either over exaggerated and bigger than normal teeth, or they're just lines that look like stitch work.
https://www.google.com/search?q=sugar+skull+makeup&safe=off&source=lnms&tbm=isch&sa=X&ei=7q_lUcnQPIeUiQLwpIHoDA&ved=0CAkQ_AUoAQ&biw=1920&bih=965
The first one still looks good, imo, but it has a look more like it had been worn a while, starting to show the underlying skin through the paint. Could all come down to lighting, too.
The stitch work was my original idea for the mouth and I think I may have to go back to it. After looking at it a bit, I think I might be able to keep the current mouth paint if I make sure it does not go outside Genesis' lips since that seems to be warping the texture. Either way, I'll be sure to post updates when I do...
Also, for another visual resource, take a look at RIPped by MortemVetus at RDNA http://www.runtimedna.com/RIPped.html
It might help to give you a better perspective regarding painting teeth over mouths.
Tattoos are actually pretty easy to do and with the right lighting you can get something like this, without any post work.
It's basically opacity, multiply and overlays in PS.
(Excuse the demonic look)
If you need any tips when you start working on tattoo's, let me know.
I don't mean to derail your thread, but about the above image, do you have any tips regarding tattooing across seams? I've had this idea forever regarding a rather large tattoo that spans from the chest, over the shoulder, down the back, and around a leg. I have CS6 Extended, and know how to paint directly on figures with 3D mode, but if there's some way to distort a previously made layer and make it wrap around the 3d figure so I can flatten it to the skin texture, I'm all ears (or eyes in this case). Unless this is better done in another program.
Tattoos are actually pretty easy to do and with the right lighting you can get something like this, without any post work.
It's basically opacity, multiply and overlays in PS.
(Excuse the demonic look)
If you need any tips when you start working on tattoo's, let me know.
I will, thank you! I'm very much of a newbie in every area imaginable, so I need all the help I can get. Of course, I'll first try fiddling on my own. When I'm ready. But I know where to go for tips, thank you!
Getting things to match on seams is super tricky. Mainly because the textures are not as "straight" as we think. If you look at the first image below, you can see what happens to perfectly straight lines going across the texture.
The second image shows a tattoo somewhat lined up across the back. If you look at the bottom of the tattoo, it looks like it needs to be nudged down a bit, but if you look at the top it looks like it need to be nudged up. You CAN get it to line up near perfectly, but that would involve a lot of tweaking. You can re-size just the edge of the tattoo, where it meets the seam to get it to work.
The third image shows what the texture looks like. As you can see, I had to rotate the tattoos to get them to line up.
There are other ways, as you can see in the "Fighter" pic. I did that in DS3 for a text game mod. If you look closely, the tattoos never go over the seams (It's also the same tattoo re-sized and rotated over and over again)
Doing it this way works amazingly well, trying to add a single image through seams is very annoying.
Sorry for all the attachments lol
Thank you for these! With the first image, how would you compensate if you did want them completely straight? I'm assuming you'd arc the lines, judging by your last flower pic?
I know for sure that you would have to rotate the image so that the "center line" of your image matches the edge of the seam (which is what you see in the last pic)
To get it to match perfectly you would have to scale the "center line" of the image slightly. I haven't got a chance to test it yet, but I'd imagine the best tools for this would be "perspective" when your free transforming, since you need to scale only one side of the image.
Personally, I think the last flower pic looks fine IF you're going to render from further out and the image isn't too complex.
Also, I had a quick look at some of the textures and if you look at the limbs and torso files, it seems like you might be able to cut them up and put them together, like a puzzle. Again, I haven't tried this, yet, but it would make tattoo's from torso to arms a lot easier to connect...
I've thought about doing that using seam guides as well, matching up all of the colors for all of the maps into one giant puzzle.
I suck at the tool, but what are your thoughts on using Puppet Warp over Perspective?
Yeah, I suck with them too lol
I've never used Puppet Warp, only saw a video of it a while back. It looks like it could work for this, but again, I haven't ever touched it.