Skin + Lighting issue
 OminousAutumn
Posts: 401
OminousAutumn
Posts: 401
Hi All,
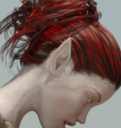
Can anyone explain why some of my lighting setups create this effect on the skin? I am using two iRay Ghost Lights and a distant light. Oh and environmental lighting. Why is this happening and what are your thoughts for creating a lighting set-up to yield the most reaslistic skin? (What are the best lights to use for realism, I will buy them. Are there lights for purchase that yield better results than the Ghost Lights, or is it a matter of technique? If so what is the outline of that technique?
This seems to happen to me a lot in a variety of situations and I cannot pin down the underlying cause.
Thank you for your help!
Daz 3D is part of 
Connect
DAZ Productions, Inc.
7533 S Center View Ct #4664
West Jordan, UT 84084
Licensing Agreement | Terms of Service | Privacy Policy | EULA
© 2025 Daz Productions Inc. All Rights Reserved.
Comments
Distant lights are very hard and my guess would be that it ends right at this black line.
Use a spotlight instead of a distant light and dial up the lumen. You can then make it softer making it a disc at Light Geometry, the bigger it is, the softer is the light.
Personally I like to use this as the hdri https://www.daz3d.com/studio-light-pro-iray-hdri-soft-light and add a rim light. It looks good 90% of the time. If it's an interior I use the Iray interior camera https://heroineadventures.deviantart.com/art/Iray-interior-camera-for-DAZ3D-Version-1-1-728244344
Ghostlights just give "overall light".
You mention "environmental light" - what is that, exactly? I mean, I once got totally frustrated about some black spots on one character's face... and it turned out that in the end, it was the light distribution pattern of the lamp light that interfered with the skin surface. I kicked out the map, and everything worked fine.
As for realism... there's outdoor-realism and indoor-realism. Indoor lights are usually much lower and come from all sorts of angles, while outdoor, you have the sun, and light from the sky. So, what environment-realism are you after?
EDIt: This is an example for a (in my opinion) good outdoor light set by https://www.daz3d.com/cake-one:
Thank you!
Thank uou for your response. I am after indoor realism. I will purchase whatever elements are needed to obtain that look.i just dont know what they are. 2 soft lights, a rim light, and the environment. What is the best envoronmental lighting for light entering windows? And what are the best indoor iRay lights for yeilding realism?
I will try aiming the distant light away from the subjects and hitting them with a softer spot for the moment!
Well, there is no "perfect" indoor light. There are a couple of very good "photoshoot" sett, like the BOSS Light set: https://www.daz3d.com/boss-pro-light-set-for-portraits-promos or inanglory's stuff, like https://www.daz3d.com/inaneglory-s-photo-studio-point-and-shoot-iray
But when you want to light up a living room or such things, you'll have to compromise. I usually use a mixture of Ghostlights and surface lights, and if I need directional light, I also use spotlights and/or distant lights if I have no HDRI that fits the description. Outside of the CakeOne set, I often use Skies of Iradiance, which give a very good light. https://www.daz3d.com/skies-of-iradiance-high-sky-hdri-bundle-for-iray
So, the main question is, do you have a "set" or are you taking more promo-style indoor images?
Below, you can see the example of different lights used.
This first image group is set in a corridor that has direct light. I used the Ghostlight Kit with Sunglight settings to add more light to the corridor. The outside light is one of the Skies of Iradiance Daylights.
The second set is indoor, in a closed emergency treatment room. The light is very bright. I used several Ghostlights from the top to simulate strong lamps. The setting was for artifical light. Because I have quite a few light sources in the room, everything is evenly light and kind of bright. Also, there is a surface light above the hospital bed that has a slightly more yellowish light. Finally, if neccessary, I also placed a ghostlight closer to a character with a side angle, like in the bottom image that is slightly lightened from below.
This here has quite a few light sources with different settings. There's a lot of lamps that have emissive surfaces. In addition, to the left and the right are stained glass windows that you see in the background. I made them emissive; there is no sunlight coming in. Unfortunately, while those windows are huge and emmit a beautiful bluish light, they weren't rally helpful in giving light to the scene, because you could only crank them up so much before you had gleaming bright walls. So, I took the surface material and used it as emissive map on with a ghost light.
All three sets try to be realistic...
Ok thanks! 2 questions.
1: what are the exact settings to make an object emissive?
2. How in the H, do I get candles and practical lights to show up/look normal? I have never been able to manipulate practical lights (the ones that have the parameters to do so) beyond their defaults.
When you want to make a surface emissive, you have to do two things - first is to plug the base color map also into the emissive slot, then set the emissive colour to white. That will make it emit light. The stronger you crank up the lumiance, the brighter the surface will become, just like in real life. So, if you still want to "see" the patterns of the surface, you can't make the light too bright.
Here's the setting for the stained glass wall:
EDIT: I'm not sure what you mean with "practical lights"?
True, if you want the real "pop" effect, the rim lights are not to be neglected. Otherwise, you'll have a slightly flat look, like you can see on the last of my pages.
Thanks!
I will try this but when you say "the" base color map...are you referring to the base color map of the object itself that is trying to have light emissed from it?
Practicals - means lights that we see in shot like candles and lamps etc. I cant seem to have any control over those.
Yes, the base map is the one of the object that is casting light. For example, in a candle, you might have a "flame" material. Use that base material map in emissive.
Practical lights... Ah... well, they can be a bit tricky. Most of the time, you can't contril them, because they aren't Iray emissives (3Delight materials, for example). So you'd first check out if you are dealing with Iray materials or Iray materials. If you have 3Delight materials, you have to convert them to Iray.
It's also important that your object has a separat material zone for the light itself. Otherwise, the method described could lead to unwanted results. Is there a particular set that troubles you?
Btw, if you have a lot of lights in the scene, this tool is pretty usful: https://www.daz3d.com/iray-light-manager-pro
Thank you.