Is it possible to delete body parts/anatomical assets from the base model?

Hi again,
This time I have a question about the possibility (or not) to delete body parts/anatomical assets from the base model.
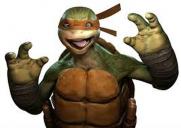
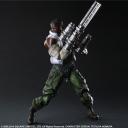
I'd like to try to create something similar to Barret from FF7 or a hand similar to Teenage Mutant Hero Turtles (see attached images for a better undertanding).
The only thing I seem able to do is shrink or enlarge some body parts with the "scale" option in the "parameters" tab, but I can't find a way to simply delete them from the model.
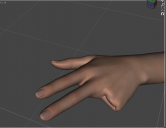
While the fingers scaled down to a minimum don't look very good, but are somewhat passable for my initial goals, the forearm at minimum scaling just doesn't work.
So, to go back at my main question: Is it possible to delete only specific assets?
I'll be grateful for any knowledge you can share.

Daz 3D is part of 
Connect
DAZ Productions, Inc.
7533 S Center View Ct #4664
West Jordan, UT 84084
Licensing Agreement | Terms of Service | Privacy Policy | EULA
© 2025 Daz Productions Inc. All Rights Reserved.
Comments
It can be done, but it's tricky 9and likely to leave seams in the maps). The old creature creator morph eliminated one finger by shrinking it and moving it inside one of the remaining figners, locking its bends (by multiplying them by 1-the morph value) so that it couldn't mess the look up. On recent figures you could also use a geoGraft to replace the unwanted body parts with a cap or other concealer.
If you just want to make them "disappear", you can also go into the scene tab, select the bone in question, and klick on the eye in front of it. They are still there in their natural shape, but won't show up in a render.
Thank you both for your help.
Geografting seems to be still a WIP thing (http://docs.daz3d.com/doku.php/public/software/dazstudio/4/referenceguide/terms/geo-grafting/start), so I'll have to understand how a noob like me can implement it.
It seems that the creature creator morph still hasn't been updated for Gen8 (i can see previous versions for Gen3 and below in the shop), but the idea of shrinking it and moving it inside one of the remaining fingers locking the bends seems like a nice solution.
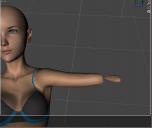
As for the disappear, thank you for that hint. Unfortunately I was not able to locate the bone (as I think they are hidden by default) and went the long way using the "geometry editor", i then manually selected the polygons I didn't want to see and used hide+delete hidden to get a similar result.
After trying this roundabout way, I got a slightly cleaner result on fingers and a better result on the arm.
With time I'll have to figure out how to place a cap on the forearm.
As for the fingers, the "scale" option in the "parameters" tab seems a bit quicker and wouldn't need to use caps on the missing fingers.
@richard_haseltine: since you mentioned the "locking the bends" option, I was wondering if there is the possibility to do that without the creature morph addon. If I use the scale option to a negative value (which sends the finger inside the plam of the hand) I end up with the seams/rims you see in the sideways hand picture from my previous post.
Thanks again for your kind help.
The bones are not hidden, you just have to go through the hierachy. Anyway, Geografting is not WIP, it's been around for a while.
I dug out this tutorial, maybe it will help you. It's for DS 4.7, but I think that the controls have mostly remained the same. https://www.daz3d.com/forums/discussion/24555/tutorial-starting-out-with-geo-grafting-repost
Thanks for the info about the bones, and thanks a lot for the link!
I'll check it out.
To lock the joint, you need to have your morph that will trigger the lock (obviously).
Now, as you slide the slider for your morph up to 100% the value of the HiddenConstantOne property shouldd rop to zero.
When your morph is zero the transforms will act as normal, when your morph is at 100% they will be multi[plied by 0 and so effectively locked.
You can now hide the constant by clicking the gear icon on its slider, selecting Parameters settings, and checking the Hidden box.
Thank you for the detailed, step by step, guide and for your time.
I'll try it on a real morph tomorrow, to see if I can get it to work.
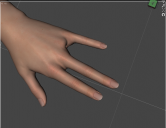
I've tested it on "scale" which isn't a real morph per se, and it didn't seem to change anything.
Also once I hit 0% on "scale" the body part simply stretched upwards for various meters (at 0.01% it still appeared attached, albeit very small).
I've attached a screenshot just for showing the funny result.
Scale wouldn't work, since 0% is vanished and 100% is no change - it should work for rotations and translations.
Hi again,
I just got back from work and I tried to apply the HiddenConstantOne settings on a translation after reducing the size of the finger with scale (otherwise the palm isn't big enough to accomodate the whole finger).
I still need to get the correct numbers patched in, but the end result looks much cleaner compared to my initial attempts.
Thank you for helping me out!