Need an Idea howto fix a Mesh for a Hexagon-made Outfit for Genesis Female
Hello,
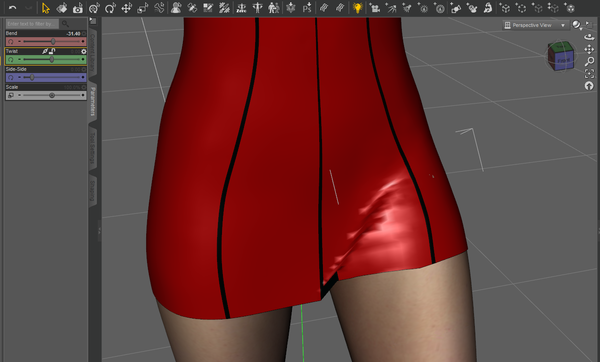
this is now my first Hexagon Model, a Dress for Genesis, but i don't know howto get the Dress following Poses of Genesis. If i move the leg of Genesis, the Dress looks like the Picture at the end shows. Also Shapes for Genesis let the Mesh of the Dress explode.
What to do next, to get a Dress that follows the Poses right and can be used by other Shapes?
Is weightmapping the answer? And howto do that on an Clothing Item with no Bones? I have the Tutorial "Advanced Rigging in DS4" but my english is not that good and the Tutorial did not help me. Video-Tutorials are much better, so this Dress was the result of the Tutorial "Classic Bikini Hexagon and DAZ Studio".
I used the Transfer-Utility and set the Reverse Source Shape From Target - Option.
My Mesh is very smooth, just for tryout. Lowpoly-Modelling will be the next step.
Sorry forgot to say Greathings and Thank you All for the great help ;-)
Yandris


Comments
Yes, you need to use the Polygon Group Selection and Weight-map Paint tools to edit the maps - skirts are quite tricky as you want a smooth blend from right to left, but the Transfer utility has probably given you a much sharper split (hence the crease). Try selecting the skirt with the Polygon Group Editor and then with the Weight map painting tool select the map for that bend in the Tool Settings pane then right-click in the viewport and select Smooth Selected faces.
If the mesh is low resolution it will probably have trouble following the morphs, but exploding sounds very dramatic - perhaps an image would help.
Hello,
I have now completely selected the dress with the Polygon-Group-Editor and then I switched to Weightmap-Tool.
But now when I brush over the Destroyed mesh, nothing happens. I have already looked in the tutorial Advanced Rigging for DS4, but what is described there about the Weightmap tool is very rare. Nothing that could help me. Can you explain me step by step how I must use the Weightmap tool?
I would be very grateful!
Greetings
Yandris
Did you select the weight-map you wished to adjust in the Tool Settings pane?
Hello,
there is no Map to select, how to create a Weightmap to select?
My Tool Settings looks like this:
You ned to select the Left and right thigh and adjust the weight map for each seperately. Click on the little arrow next to your dress name and you will see the bone names.
If just changing smoothing intervals doesn't help you can also reduce the weight to .4. You will need 'show hidden dials' ticked to see the weight slider.