Horrendous overexposure problem
 jtdekoning
Posts: 145
jtdekoning
Posts: 145
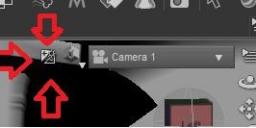
What is this silly thing next to the IRay icon and how do I reset what ever the heck it did??
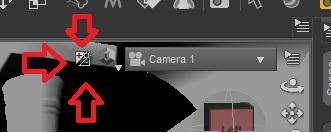
Somewhere along the lines of putting together a project, I must have hit this icon and now everytime I render something it all comes out horrendously over blown while the preview is acting like it is not lit at all.
How can I reset this, or better still remove it completely so I don't screw something up again?
Thanks.
what is this.jpg
331 x 133 - 15K
Post edited by jtdekoning on
Daz 3D is part of 
Connect
DAZ Productions, Inc.
7533 S Center View Ct #4664
West Jordan, UT 84084
Licensing Agreement | Terms of Service | Privacy Policy | EULA
© 2025 Daz Productions Inc. All Rights Reserved.
Comments
It's an exposure metre, it should adjust the tone mapping settings to make the exposure for the clicked area correct but like you I have always found it gives undesirable results - I'm really not sure what the target of the click should be.
I cannot believe this! Richard, you are my guru and mentor! If you don't understand something, who does?
Slightly less worried, is it worth making a new camera? Would that set to default?
Sorry, I missed the need to go back - try clicking Defaults in render Settings, or to avoid making other chnages go to the Tone mapping group and alt/opt-click all; of its sliders to restore that withour affecting anything else.
I'm glad I found this, I've been trying to discover what that little icon was after I accidentally clicked on it the lighting in my scene changed, essentially just the exposure time and the f-stop setting. I would like to know if there is a good reference to all the icons and symbols in Daz Studio that go beyond the existing User Manual.
Sso... uh. What am I missing? This strange all-white affect has been applied to all my views - not just the camera. And I am completely stopped by this terrible, terrible feature. Could someone please clearly explain how I get out of this mode? I can't get that horrible little button to do any of the things it says it can do when I'm in Iray preview mode?
And how do I remove it entirely? I can't believe there's a button I can press in the main interface that does this.
It seems it is working like a light meter in photography. In rendered view I can activate the tool and click in an e.g. dark area of the scene. The tool seems to analyse how much brightness is needed to have that part of the scene lit sufficiently. If the part of the scene was quite dark it adjusts the tone mapping accordingly. As a result the scene becomes lighter overall. But if I click on a lighter part of the scene the tool makes everything even more bright which most often causes everything being blown out.
To go back do what Richard wrote. In tone mapping either ALT + Click the entries to set them all back to default or just adjust the Exposure Value.
There are three settings for the widget.
1) Exposure
2) White Balance
3) Both
I wouldn't use both and strange things happen :) I use White Balance occasionally depending on the colour temperature of the lights I am using. You can reset everything if it goes wrong by going into Tone Mapping and clicking the Defaults button. The Exposure setting can be handy to set the camera to get light into a dark corner, which is what Anim got in his post.
It has a white balance mode - cool. How do you set it to that mode? I could not find an option for that.
From what I've read, you can't. it used Auto White Balance based on finding what Studio considers "white" in a scene and then adjusts accordingly. This is from the Documentation Center:
"The White Balance option establishes what “white” is in the scene and calculates the pixel white average for the selected pixels. Daz Studio then adjusts all other pixels in the render to have a white base level of the calculated white average. "
Which is a damn shame. WB is one of the most important aspects of photography, and the wrong WB (or Auto White Balance) will ruin a picture - or in this case - a render, to the point where I'd never use it. Auto White Balance NEVER gets to white, it always assumes 18% grey, which limits colors. (e.g.: a sunny day will never be truly sunny.) For photography this is good enough for the masses and their pictures, but for pros and photographs it's terrible. I never use my protrait camera - a Canon 5DSr - without setting the white balance to the light I'm using. Otherwise, it can ruin a photograph, and hence a whole shoot with a paying customer.
..Joe
just make an small diffuse white plane and put it in the scene.
then in photoshop and the camera raw filter select the whitebalance tool and press it on that plane.
whitebalance for the whole scene corrected
or add the colorchecker prop from IGs photographers toolbox
https://www.daz3d.com/ig-photographers-toolbox-photo-lights
i also recommend using 32bit canvases instead
you get higher dynamic range and better colors in the renderers and have much more control over the exposure and lights.
It is under the Menu: Window/Draw Settings/Advanced/Draw Style/NVIDIA Iray/
Rev2019: All that does is give you an 82% white. Again, auto WB NEVER sees more white than that. (If they're following camera rules.) Even using a color picker card in photography, if it's set to AWB, that's all you can ever get. it's an old setting from the days of film that has never been updated.
Fishtales: All I see is WB on/off button, no place for settings for WB anywhere.
..Joe
I missed out Advanced, fixed now.
In DAZ Studio 4.12 it is under the Menu: Window/Draw Settings/Advanced/Draw Style/NVIDIA Iray/
I use the Auto Exposure Tool on occasion, that's the little box at the top right of the render window with the +/- signs, using a grey cube as my selection surface set at 18% grey, that is 118 or 0.18/0.18/0.18, Base Colour.
To set the tool to White Balance go here in DAZ Studio it is under the Menu: Window/Draw Settings/Advanced/Draw Style/NVIDIA Iray/
It set me wondering if the colour actually made a difference so I set up a scene with three cubes with the base colour set at 118, 192 and 250 with the numbers at 255. These are set with colour settings I found on the internet.
118 is the Grey Scale Card used by photographers.
192 is a medium Grey.
250 because there isn't a pure white in nature.
255 which is pure white.
I added the base Genesis 8 and , for outdoors, the Highlands Preload scene with the fog and mist turned off. The indoor scene uses Spa and Lounge preload scene. Lighting was Sun and sky 21st June at 14:30 in the Northern Hemisphere 56º N -4º W for the Daylight scene, 21st December at 23:30 for the night scene with a Distant Light -- Colour 217; Intensity 89%; Lumen 0.10; Temperature 4100 for the Moon.
I used the front right corner of the cubes for the processing point.
This is the 118 which gave a White Point of 1.00-0.96-0.86
Click on image for full size.
This is 192 which gave a White Point of 1.00-0.97-0.89
Click on image for full size.
This is 250which gave a White Point of 1.00-1.00-1.00, so did the letters at 255.
Click on image for full size.
This is 118 which gave a White point of 0.81-0.52-1.00
Click on image for full size.
This is 192 which gave a White Point of 0.50-0.31-1.00
Click on image for full size.
This is 250 which gave a White Point of 1.00-1.00-1.00
Click on image for full size.
The indoor scene gave a White Point of 1.00-1.00-1.00 on all cubes.
Click on image for full size.
To summarise then In that particular outside Environment the colour of the Cube didn't make a lot of difference in the Daylight renders but it did in the Night renders.
In the indoor scene using that Environment the colour of the Cube doesn't make any difference to the White Point.
This is in no way a comprehensive test and probably each environment and lighting will cause different White Points but it was interesting to see.