Smoothing Clothing
I've been having trouble smoothing clothing on a few occasions and am posting this for additional suggestions.
I have tried applying smoothing and collision modifiers and they do not solve the problem.
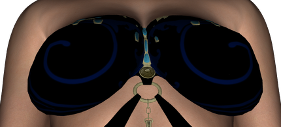
Attached is a cropped image as an example.
Any other suggestions would be greatly appreciated. Thanks for any information you can provide.


Synchopae_JewelOfTheOasis_Smoothing_201305210743_281x127.png
281 x 127 - 41K


Comments
The image is very small, you can post a much larger image, and the forum software will reduce it for display, and give the larger version when a user clicks on it.
I can't really see what you mean, is there slight poke through. I almost never need to use smoothing, what clothing item is it, and what figure. There are a lot of ways to get rid of poke through.
Smoothing options can only do so much. That needs to be better modeled to fit the figure first.
If it's for Genesis, model to the basic 'as it loads' figure. It will 'grow' as Genesis is formed into a female character or muscular male.
Sorry I wasn't clear enough in my earlier post.
The issue is where the wardrobe item is clearly jagged around both breasts (this is not a poke-through issue).
With the excellent quality of DAZ 3D products, I expect the wardrobe item to be completely smooth.
After pointing this out, you can probably notice it in the original attachment, but I'm attaching a larger one for additional reference.
Any tips on resolving this would be greatly appreciated.
Thanks for any information you can provide.
It looks like I've been able to solve the jagged edge problem by the following:
1. Select wardrobe item from Scene tab
2. Select the "Display the Active Pane Options" button
3. Select Edit | Convert to SubD...
This smooths the wardrobe item and removes the jagged edges, however poke-through appears and is not easily solved.
I'll need to experiment with it more to find the right combination and will post the results when I do.
Gee I didn't recognize it as a Daz product, oopsies ... yes it should fit the intended figure. If no one else who has it pops in with a solution, before time runs out, if it were mine, I'd head to CS for a refund.
posts crossed ... okay.
Use the Poly selection or just Pick that part if it is sep mesh and Sub Devide it once.
I don't recognise the outfit...looking at the edges I can see what you are trying to fix though.
Can you tell me what settings you have tried? It may help me to provide suggestions for settings to try.
I generally change the smoothing type to generic as this will often help smooth out minor issues especially with shoes.
I also normally play with the weight setting and set it around .70-.75
Smoothing iterations will vary from item to item and I normally play with it until I get a result I like.
Two questions-
Where is the Poly selection, and what does it do?
Where is the weight setting? (Is it in the smoothing/collision section? My studio isn't open)
I think Jaderail is talking about the poly selection in the content creation tools.
The weight setting is found in the smoothing/ collision section under parameters. Sorry I'm using an iPad at the moment so my computer isn't even on. It's not called smoothing/ collision but if you go to where you adjust the smoothing and collision iterations it's in the same place. There are some other sliders also but I'm still trying to figure those out.
As near as I can tell weight refers to the fabric weight at least it reacts how I would expect for that. There is also a secondary weight but I'm not sure what that does.
Thanks Pendraia, when I get around to exploring it I'll be asking a lot more questions, lol. I'm not into weights yet. I will go take a peek where you suggested though just out of curiousity.
Lol curiosity is good...if anyone works out what lock distance is for please let me know.
I'm sure there is more than one way to resolve this issue, but I finally settled on the following procedure:
1. Select Actors, Wardrobe & Props tab | Select Smart Content tab
2. File menu | Open... | Navigate to and select Presets/Characters/.duf
3. Select Content Library tab | Navigate to wardrobe folder from Products | Right-click wardrobe item | Merge Into Scene
4. Right-click wardrobe item in Perspective View | Select Fit "" To... | Genesis | Accept | Victoria 4 | Body Suit | Tight | Accept
- note: jagged edges and poke-through will be visible here
5. Select Scene tab | Select wardrobe item | Select Display the Active Pane Options button | Edit | Convert to SubD...
- note: jagged edges will be removed, poke-through will still be visible
6. Select Display the Active Pane Options button | Edit | Apply Smoothing Modifier
- note: most poke-through will be resolved
7. With the wardrobe item still selected: Select Parameters tab | Select All | Adjust NipplesDepth morph to 31
8. Adjust Smoothing Iterations to 16
9. Adjust Collision Iterations to 5
I considered experimenting with D-Formers and Weighting, but decided to go with what I know and work from there, although I would much prefer clear nipple definition on the wardrobe item, which I have not been able to master. Any tips on that would be greatly appreciated.
As you will see in the attached image, the results are stunning (as always). Thank you DAZ 3D!
To be able to see the weight settings you need Show Hidden Properties checked.
Lol I didn't know that...but I always have it checked.
Bog, I'm glad you found a method that would work for you.