What is the button with the plus and minus sign?
 bsellner10
Posts: 1
bsellner10
Posts: 1
I was messing around in Daz and clicked this by accident. My question is what is it and how do I turn it off?
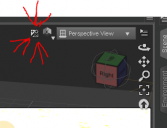
Capture.PNG
319 x 245 - 17K
Daz 3D is part of 
Connect
DAZ Productions, Inc.
7533 S Center View Ct #4664
West Jordan, UT 84084
Licensing Agreement | Terms of Service | Privacy Policy | EULA
© 2025 Daz Productions Inc. All Rights Reserved.
Comments
Noooo you should never push that button - now you ruined your installation of DazStudio.
LOL. Seriously this is for to set the Viewport Preview Mode aka DarwStyle to NVIDIA IRay - an auto updating live Preview of IRay reders in the Viewport. Maybe they have been adding this thing that "looks like a button with the plus and minus sign" but as far as I know has no function if you click on it - to show you that the auto updating live Preview is activated.
If you ask yourself why is DazStudio freezing after this and give you no information about that - DazStudio wants to say - your computer is damn slow - go and buy yourself a new more powerfull and expensive one - then come back and try it again.
Or you can click on the symbol right next to it to show the Viewport DrawStyle Options menu and set the Viewport Preview Mode back to something default like the "Texture Shaded" one.
One hint, to know what the heck is going on, is to activate the Status Bar. That - in a somehow misterious manner - can be activated / Enabled by right-clicking on some Tool Bar.
This is useful for to know what DazStudio is busy with at the moment and doing in the backround and why it looks like its freezing or dosnt response to user input as fast as usual.
The Status Bar is a special extra Pane where DazStudio starts to talk to you and in your case with DarwStyle set to NVIDIA IRay or if you have alot of Smoothing Modifier applied - also will showing you an progress bar - to let you know why it is busy with calculating something in the backround for you to update the Viewport Preview as soon as possible with your current hardware.
To activate this useful Status Bar Pane - right-click somewhere on a showen Tool Bar in the DazStudio InterFace and select it in the right-click menu to Enabel the Status Bar.
With this you can set it to be Enabled by default. Unfortunatly I think by default or with changing some Layouts with Window>Workspace>Select Layout... the Status Bar gets Disabled.
Use Window>Workspace>Save Layout As... to make shure its allways Enabel with your current Interface Layout.
If you think - hey my DazStudio dosn't look anything like this - as showen in this screenshot - see my thread How to Customize Daz Studio !? for further info.
It turns the sun off and on when in NVidia preview mode. Click on the widget, then click in the window.
It's an auto-exposure tool - click it, in nVidia Iray preview mode, then click on an area of the scene to use it to set exposure for the render.
Here I have another screenshot:
Showing the Status Bar in action with Apply Smoothing Modifier to Mesh. Its like a Benchmark Scene to test how fast DazStudio is on your Computer LOL.
Yeah, it's auto exposure tool, I avoid like plague because I don't know how to work it, had to move back to a previous save in rage after messing with it one time.
THANKS!
Actually it's a quick autoexposure or white balance setting... click it, draw a rectangle around you scene... then you'll see the result.. to tweak it, go to render settings/tone mapping and adjust your shutter speed, exposure value etc.
MP
Thats the best answer... Who uses it anyway?(serious question) it seems to produces terrible results when following the on screen instructions and how do you change it from exposure to white balance?
But most importantly for me is why does it take up such a prominent place in the viewport? and can i get rid of it!
As far as I can tell. To undo that things effects, go to Render Settings > Tone Mapping > Exposure Value. Set Exposure Value to 13.0 (Default)
I'm actually a fan of the white balance functionality, which produces useful results at least 50% of the time. Exposure...not so much.
-3W
Thank you! Thank you!! THANK YOU!!!!!!
I don't know if it's something that broke in one of the updates, but clicking "Defaults" with the "Render Settings" tab open makes no changes to any of the settings there.