Need some tips on Smoothing Modifier
 Atanacius
Posts: 333
Atanacius
Posts: 333
Ok, hello!
I have some questions on Smoothing Modifier and how it works.
Basically I apply often Smoothing Modifier only if I see the "figure" is not fitted perfectly onto a model character.
I apply by "Edit"->"Apply Smoothing Modifier" ... And then have a new settings in "Parameters" panel called "Smoothing Modifier".
Then I use it to "auto-adapt" by smooth technics the clothers or/any other stuff that I want smooth.
By the time, for Clothes I choose something other than my Character figure, like... an another part of a clothing figure.
I must admit, often the result is perfect (or near from), but, here is actually my problem..
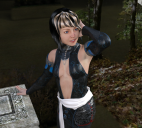
In my render /scene preview (look the File Attached for seeing my render), you can see some "clothes" are not smoothed very well, take the example of the Magus Collar..
I Applied Smoothing Modifier on Magus Collar and select as Collision Item the Siren Dress instead of my Character Model (since I want it collide with Siren Dress firstly).
And I fitted to my Character Model..
So, you can see a spot near the neck (left side) and a bit (right side) that aren't well smooth to collide perfectly with Siren Dress...
I know we can adjust how many collides/smooth iterations can occurs, but... This not fix the issue since if I do that, I will have instead a part of my clothes (Collar) distorded)
Did you have any solution to invoke and submit me?
Also, any tips to COLLIDE/SMOOTHING MODIFIER on more than ONE Collision Item at a time for a particular figure will be useful, it's possible to do that?
Thanks for any help !
Daz 3D is part of 
Connect
DAZ Productions, Inc.
7533 S Center View Ct #4664
West Jordan, UT 84084
Licensing Agreement | Terms of Service | Privacy Policy | EULA
© 2025 Daz Productions Inc. All Rights Reserved.
Comments
It may be better to use a DForm or Push Modifier to help with or isntead of the Smoothing Modifier.
There isn't a way to collide with multiple targets, though it's a common feature requests (as is being able to weight-map the smoothing, at least by me) but one trick is to use something like a body suit as the collision target, making it invisible.
You will need to create age geoshell for the figure and adjust its offset till it is above the dress then make it invisible. Have the collar collide with the geoshell, these steps will have to be done for every layer of clothing. The Smoothing Modifier can only have one collision target and it is with the entire mesh.
Thanks @Richard%20Haseltine That's a great start point (I mean, using PushModifier, since I have not any Bodysuit for my character).
Well, anyway, there is a slightly issue again with the Collar and now the Short (since I replaced SmoothingModifier by PushModifier on theses two's clothing parts).
As you can see on the new test_render in attached file in thi spost, the fact is now, "strings" parts of the Collar/Short are a bit more too fat..
(EDIT: when comparing those two renders in PaintShop Pro, I also noticed the hair has slightly been displaced aswell from some pixels)
Any ideas how I can fix it ?
Thanks for any tips and sorry for the late response !
I never used to create Age GeoShell, any tutorial to do that?
Yeah sad for the Smoothing Modifier allowing only 1 collision target !
Thanks for you answer and sorry for the late response @jestmart !
You can also try Fitcontrol from Zev0 in the store.(See 5th thumbnail )
Yeah but... It sit in my wishlist since a while (G2F's one), anyway, since G3F and even G8F is released I searched for a creative method instead of scripts (Anyway, Zevo scripts are amazing!)
Any other answers/tips instead of purchasing a new product ?
Push Modifiers move the surface in/out along the vertex normal - the line sticking out at right-angles from the vertex. So for a cylindrical shape like the cords it will make them thicker or thinner. This is why you will probably need a mix of tools, what works well in one place may work less well in another.
Didn't all understood, but ok.
I think it's logic why this parts then is more fatter than other parts.
Will perhaps use D-Former.. on "this part" ?
Yes, a DForm would probably be ideal for that area.
So "@Richard Haseltine" and Others, thanks for your time taken involved to advising me !
I followed your advices, and came to ending with this pretty great result (see attached file).
(especially Richard Haseltine advices was very valuable in what I want achieve!)
Well, the hard part was indeed the manner to deal with the collar and sash.
Collar use now 3 D-Formers (based on painted weight mapping) plus Smoothing Modifier Collision/Fit To on the Character !
It no more using Push Modifier.
But use scaling for D-Formers/Figures in some parts aswell as translating in others.
I doubt my settings will fit any other poses than the one shown in the render.
It now use instead of "Base Shape Matching" Smoothing Type the "Generic" option.
Anyway, with the Smoothing Modifier the "jewel" part of the pendant attached to the collar was gone, so, I played a bit with the "DForm" parameter in the Collar and it fixed it !
Pretty great result (the back of the collar neck is a bit distorded, but it don't make any importance since it's never showed in the render!)
Sash use now 1 D-Former (also based on painted weight mapping) plus Smoothing Modifier Collision on the Siren Dress (Fitted on Pants) !
It no more using Push Modifier.
But alike my Collar, it also use scaling for D-Formers/Figures in some parts aswell as translating in others.
Here it also I doubt my settings will fit any other poses than the one shown in the render.
It always use "Base Shape Matching" Smoothing Type's option.
The hard part was to simulate the tighted Sash onto my Character.., so for simulate it as best I was able is was to playing a bit with the "Smoothing Iterations" setting and morphs like "AdjustSideL", fixed too !
I also used (but it was not required) for making a bit more style to the Sash the "Split_Side-Side" morph ! In order to making the sash being splitted.
Great result I like it !
For finish, it was time to fix that Siren Dress that I want above the Short not under BUT under the Sash not above!
For achieve this, I Fitted to the Short on my Character, Collision Item of the Smoothing Modifier set on Pants.
"FMBExpandAll" morph settings was used in order to "fix" the tightness onto the Pants !
Then afterwards, I concentrated my efforts onto the "LMover" and "RMover" parts of the Siren Dress, my goal was here to put them under the Sash.
Using 1 D-Former made the task !
Again, Painted "LMover" and "RMover" and a bit of the top waist as Weight Map, now use scaling for D-Formers/Figures in some parts aswell as translating in others.
Aswell, it no more using Push Modifier.
The result is pretty amazing, I love it!
I never used DForm tool (no joke) !
I even never tought it was working on Painting area !!
Now I know a powerful tool in DAZ Studio, and this elevate my creativity far more better !
Thanks !
Cheers !
EDIT: Hope my explanations how to achieve this will be useful to other people aswell !
Glad you were able to get the result you wanted. There are usually multiple ways to approach a problem, but once you find techniques that work for you it's probably best to use them wheer possible and keep the ones you are less comfortable with for special occasions when nothing else will work.
I know this is an old thread, but thank you! I was able to use these techniques to fix the fit of "Bunny Dazed" to g8f. Thanks again!