creating a 3D model
 jvdesuit1_582de7c548
Posts: 182
jvdesuit1_582de7c548
Posts: 182
Good Morning
I'm wondering if I could create a 3d model for DAZ 3D 4.5 from three 2D objects I created with Bryce from 2D pictures.
I have 3 images :
A front view,
the left 3/4 profile,
the right 3/4 profile.
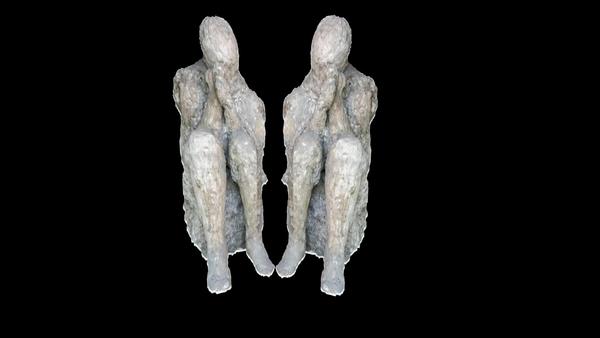
On the picture below I show 2 of the converted objects, the left and front view I've set in the scene at nearly right angle one from the other.
Would DAZ or Bryce enable me to combine the three objects (I can create the other profile without problem) and get a full 3D model. I can also create with photoshop the back view object as there is practically no details in the back of this man which was found standing against the wall near the corridor where this man was found in the ruins of Pompeii when he was caught in the restrooms of the Palestra during the eruption of Vesuvius!
My purpose is to use this model and progressively have the live man fading in from the encasing...
Thanks in advance for your suggestions .
Daz 3D is part of 
Connect
DAZ Productions, Inc.
7533 S Center View Ct #4664
West Jordan, UT 84084
Licensing Agreement | Terms of Service | Privacy Policy | EULA
© 2025 Daz Productions Inc. All Rights Reserved.
Comments
Daz Studio isn't a modeling program, so no, you couldn't. You'd need a program like Hexagon, Carrarra, Z-Brush, or Blender.
Actually it could be done in DS if the two /three objects line up properly. Once the Object files are set up properly in the Viewport you Group the items and then Save out as Object file with Weld turned on. I make simple Props in DS all the time.
Thanks Jaderail, I'll check that tomorrow.
I've discussed this with others, if you are using the Terrain Editor in Bryce to make the 3D object files your Mesh Counts are going to be VERY VERY high. This one prop could have a higher mesh count than your full scene does.
You could run out of Free Ram very fast.
We shall see. Of course I'd like it to be a full 3d object, but if I cant, I'll content myself with one of the 2 elements in the picture as this is a static element in the scene; It will fade to the skeleton and then into the roman coming back to life and guiding the viewers into the ruins of the town. From time to time when entering some of the houses or monument his memory will make the monument switch back to its original splendor. I have sketchup models of practically all the major buildings and of some of districts of the town and pictures of sketches of the building before they were destroyed by the eruption.
I'll try also not to make a too big model, which I don't need as it will be placed inside the corridor of the Palestra and must scaled in proportion to the building.
Thanks anyway for the advice.
By the way, is there somewhere a tutorial of the way you make your 3d Objects in DAZ?
The problem is not going to be the Physical size, but the polygon count. If you are making your statue with terrain objects you will find that each terrain has over half a million polygons, if used at a reasonable resolution. Any lower res will give you artefacts which will be difficult to eradicate, and even one step down in resolutions is still over 130,000 polygons for just one terrain.
If it's an Item I will use more than once I will run a free Script file and save it as a PP2 poser Prop. Once I have some free time, (I'm working on a item right now) I will do a Tutorial on how this is done.
I will not us terrain from Bryce; I'll just convert my images into 3d billboard and import them in Daz where I'm developing my scene. This is the tutorial I use to make the billboard:
Instead of Photoshop I use Photoshop Elements 11 which gives me the same principal options at a lower cost.
Transforming a 2D Image into a 3D Object
Author: Anonymous
Tools Needed
• Bryce Photoshop
Introduction
You wil see how a variety of different tools and programs work toghether to make a 3D image. Michael Jed shares a few tricks and insights to make your work eye catching and more realistic.
Step 1 - Photoshop - Preparation
Select your object, by using tools such as the Lasso, Magic Wand, Eraser and/or other paint tools, and discard the background. For those of you familiar with them, the Quick Mask and Extract modes can be utilized. Similar results may be obtained with other paint programs such as Painter and PaintShopPro.
This can be a very time consuming process. Be patient and very accurate.
Your object should now appear, alone, on a transparent background.
Save your work periodically.
The final image will now be processed into two files: one containing a gray-scale image for applying to the Symmetrical Lattice and the color image, you have already saved, which will be used to apply a texture map.
Take your prepared image and save it again as a name that identifies it as your gray-scale. Under Image > Mode, select Grayscale. Then, under Image > Mode, select Brightness/Contrast and move the brightness scale till your blacks become a visible shade of gray.
Since black is at ground level in Bryce, anything that is black in your image will not be visible when the gray-scale is applied to the Symmetrical Lattice and your image will appear to have holes in it where you do not intend. Moving all the shades up a few notches, into gray, insures the entire image will show in the Symmetrical Lattice.
Now create a new layer filled with black and merge your gray image on top of the black layer. (If you merely flatten the image, the background, if in default, will be white and white registers as the highest point of your image and you do not want that.)
Step 2 - In Bryce
Create a new scene.
Create a Symmetrical Lattice and click on the “E” to edit it.
Click on the “grid” and change it to “1024 - Massive Resolution”.
Click on new terrain and then, with everything in default, click on Picture and load the grayscale image.
To attempt this technique, you may now load grayhummerJPG provided for this purpose.
If the middle image is not black, click on it to make it black. The B/W hummer should appear in the 1st and 3rd windows. Click Apply.
Your SymLat should appear in the shape of the hummingbird showing various elevations based on the grays in your image. Edit with any Bryce tools if you need to and then click the arrow to apply.
Placing the SymLat in Bryce:
Step 3 - Step 3 Placing the SymLat in Bryce
Your image now appears as a shaped SymLat in your scene window. It comes in face up and we will deal with that in a minute. For now, let's map it, so it doesn't resemble a terrain anymore.
Click the A to edit attributes. Make the Y depth 3. As this is really a 2D mapped image, there is no real need for much depth. Click the arrow to apply.
In the working window now, click on the M to add the texture map.
Step 4 - Step 4 Texture Source Editor
Click the Image Texture icon and then the Texture Source Editor.
Open your colored image. You may select the hummerJPG here. Apply the texture and go back out to the working window.
Click the A and edit the rotation values as follows:
X -90, Y -45 (these coordinates my need to be adjusted depending on the size and placement of your object)
Step 5 - Step 5 Linking Image to Camera
Once your object is placed so that it is straight on to you as possible, link the camera to your object. Then whenever you move the camera, the SymLat object will remain at exactly the same angle and distance from it. You can do this by clicking of the Link Icon and then clicking and holding down on the camera and dragging to the object you wish to link and releasing (in this instance, the object).
If it's an Item I will use more than once I will run a free Script file and save it as a PP2 poser Prop. Once I have some free time, (I'm working on a item right now) I will do a Tutorial on how this is done.
I've found this tutorial How to Make Your Own Props in DAZ Studio
Is this what you're talking about?
I've found this tutorial How to Make Your Own Props in DAZ Studio
Is this what you're talking about?Not the Same one but it looks VERY good. Same things covered.
EDIT: That Tutorial you listed is the way to make a VERY VERY HUGE File just like I mentioned before. You will have a mesh file that is HUGE the object might not be big but the Item will be because the Mesh is so large.
A symlat or symmetrical lattice has the same number of polygons as a terrain. so using your method you will still have in excess of 524,000 polygons, unless you lower the resolution of the symlat.
If you use massive resolution, as reccommended in the old tutorial then you have over 2 million polygons in that one symlat.
I've found this tutorial How to Make Your Own Props in DAZ Studio
Is this what you're talking about?Not the Same one but it looks VERY good. Same things covered.
I've just sent a PM to Richard Haseltine, to see if it were possible to get some of the scripts in the list you mentioned which links are now dead! It's really a pity to loose such work just because you make a new site....
I've just sent a PM to Richard Haseltine, to see if it were possible to get some of the scripts in the list you mentioned which links are now dead! It's really a pity to loose such work just because you make a new site....
Richard answered; just replace forum into forumarchive to have the correct link to the post .
I do all my quick models in Google Sketchup and export as an OBJ. Its free, fast, and has a quick learning curve. I'm pretty experienced with 3D Studio Max but I still end up using Sketchup for quick props.