lighting issue w/ my scene
 WillowRaven
Posts: 3,787
WillowRaven
Posts: 3,787
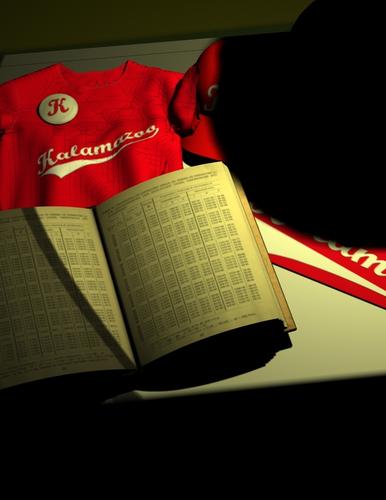
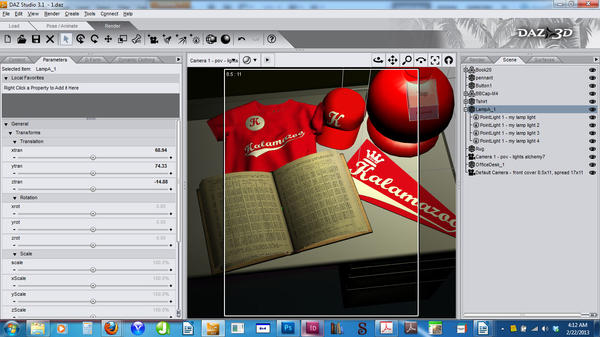
I am trying to light my scene by a desk lamp. I am using pointlights where the bulb would be (DS3). I had to use 4 just to get the brightness I needed, but the lamp is shadowing out and the t-shirt is putting out this funky tron texture. Needless to say it's not supposed to be like that. Here's the screenshot and the render.
Any help? Try to remember I am not real experienced with lighting so most of the technical jargon will allude me.
I appreciate ya'll :D
Daz 3D is part of 
Connect
DAZ Productions, Inc.
7533 S Center View Ct #4664
West Jordan, UT 84084
Licensing Agreement | Terms of Service | Privacy Policy | EULA
© 2025 Daz Productions Inc. All Rights Reserved.
Comments
Place one point light where the lamp should be, turn off its shadow. I would be looking to put some transparency on the lampshade as well. Adjust until you get the effect you need. Place one light outside the frame to provide the illumination and shadowing you want, it can be any light type that suits (spot in this case?). If the lights are not bright enough turn up their intensity until they are. Hint: turn off all lights except the one you are making adjustments to. Tip moar: if you know how, set all materials to 80% white no reflect no specular and light everything without shaders, add shaders last.
On the shade, use UberSurface or HSS for a shader...if the shade has a texture ctrl-click to load US or HSS. This will give a translucency parameter to use. About 10 to 20% on that should be enough...it will take a color, image map or both...the strength parameter can take a greyscale image to act as a control map...
The first cylinder is just color, translucency set to 10% on all three. The second is just a 'control' map on the strength...white is 'full value', black is 'none'. The third is just a texture map
OK ... I still needed 4 lights because the intensity only goes to 200 on each one, and I want no other light in the room. Removing the lamps shadow helped a lot, but I am still getting that odd pattern on the t-shirt. Can anybody tell me why and how to fix it?
It must be a lighting thing because it isn't doing it on the same t-shirt in other scenes under different lighing.
I'm not sure what the problem is, but here are a few things you could try to attempt to track it down:
I don't see the pattern across other nearby objects, which makes it seem more likely to me that the problem is on the shirt, rather than being projected by the light.
If the shirt has a material pose available, try re-applying it in case some setting in your scene got bumped. (speaking of bump... In the parameters tab for whichever surface that is, check the bump and displacement settings to see if something got selected incorrectly there by accident.) Try applying some other material to the shirt temporarily to see if the pattern goes away or stays.
See if you can identify what that pattern is. Maybe if you know what product it came from you might be able to figure out why it's there. Is it supposed to be on another object in the scene, or on another surface within that object?
It has to be something about how the light reacts to the dynamic fabric, because in the other scene where I use the same exact shirt, it doesn't do it ... it has different lights.
Here is the same scene and lighting with the original texture. As you can see it still is doing it. I also am posting the other scene where you can see under different light that the weird pattern does not show up. Is it a dynamic thing, I wonder?
Raytraced or shadowmaps?
What is the shading rate, in the advanced render settings set at?
raytraced ... shading rate set at 1 ... I assume that's the default since I don't ever remember playing with that.
You might try raising the Shadow Bias setting a tocuh - I don't think that's it, if I'm seeing the right problem, but it's a simple check.
Using a Linear Point Light will give you more control of the lighting, and doesn't fade out so quickly. You probably want either a low intensity uberEnvironment or some other lights in there to give the effect of bounced light - and you could then turn the shadow on the light itself back on, since it looks as if it's floating without. Turning up the Shadow Softness might also be an idea, depending on the effect you want (a pearlescent bulb, or a low-energy bulb, would need a bit of softening more than a clear glass incandescent).
If you zoom in close on the shirt, it's almost showing the 'uv map showing' render problem...
Try the shadow bias. If that doesn't help, try bumping the shading rate down to .3 or so...it will increase render times. If you want, you can drop it at .1 increments and use the spot render tool to render just a part of the shirt to see if it's helping (same with shadow bias).
There isn't a linear point light in DS3...
How much should I adjust the bias by? On each of the four point lights? I don't guess they are linear since I have no clue what that is ... lol. Any lighting other that from the lamp would need to be low intensity, as if the room were dark and the only 'real' light would be coming from the lamp.
Thanks :D The few times I've had this sort of problem in the past, I just changed lights or the shader I was using, but this time, neither was an option ... lol
And that may be why I didn't know what a linear point light was ... lol
Thanks for all this help, guys.
Give me a little while and I'll have a few hints...
But for the shadow bias, it only needs to be adjusted on the shadow casting lights. But adjust it in small increments (.1) and use the spot render tool...
I think your shirt problem is the Back mesh from your flatten morph is just poking through the front of the shirt. A little distance between the meshes might be the solution.
EDIT: I could be 100% wrong.
I thought that was the problem at first, too, so I re-draped and stopped it before it actually touched in more that a couple spots. So there is open space between front and back in most of it.
The bias didn't do a thing, even dialed all the way down, so now I'm playing with the shading rate and at .3 the lines are considerably lighter. I'm going to try .1, now.
Could be...and if it's the dynamic tee...then sizing a plane to fit inside it could 'fix' the problem if the plane is the collision object. Or if you are using the paid dynamic plugin...doesn't it have self collisions? If so, then enable it...
Could be...and if it's the dynamic tee...then sizing a plane to fit inside it could 'fix' the problem if the plane is the collision object. Or if you are using the paid dynamic plugin...doesn't it have self collisions? If so, then enable it...
It does have self collisions ... I never understood that part ... lol. I usually try it both ways to see which looks better ... lol
setting the shading rate down to .1 got rid of the lines. Now for the lamp not looking like it's floating ... lol
I thought that was the problem at first, too, so I re-draped and stopped it before it actually touched in more that a couple spots. So there is open space between front and back in most of it.
The bias didn't do a thing, even dialed all the way down, so now I'm playing with the shading rate and at .3 the lines are considerably lighter. I'm going to try .1, now.
Sorry, if it is a bias issue you want to go up not down - it is an offset to prevent self-shadowing. Usually that shows as stripes rather than a grid, so I am as I said dubious but it's worth eliminating.
And sorry for forgetting you were using DS3 - Linear Point Lights are indeed DS4+ (or ubePoints with decay set to 1).
lol ... that's ok. I'm one of those annoying hanger-on-ers ... DS4 crashes on me too much to actually learn it and I get frustrated when my runtime disappears. Plus, I prefer V4. And since I am almost always behind deadline, it's more time-effective to work with what I am more familiar with.
The .1 shading rate is working on the lines. Should I just keep it at that for all scenes to avoid the issue? Or should it be at 1.00 unless I experience this again for a reason?
It's a time/quality thing...it will increase the time it takes to render, but they'll be higher quality...play with it to get the best balance, over all.
It's a time/quality thing...it will increase the time it takes to render, but they'll be higher quality...play with it to get the best balance, over all.
In that case, since most of my work is for print, the higher quality is more important to me, so keeping it at .1 works for me :D
Thanks, guys.
Now, about the lamp shadows ... turning shadows off helped the shadowing out of key elements, but now the lamp hovers. Ideas? Would maybe a fake shadow made from black primitive circle, just a touch bigger than the base look about right? Or is there a better idea?
You could try putting the lamp shadow back the way you had it, but also adding a second distant light pointing down from above with a very low intensity for ambient light. Enough to get light into the shadowed area, but small enough that there is still a shadow and it doesn't look too weird.
You don't have DS 4 so you don't have the UberEnvironment available, but if you do some research I'm sure there are other better ways to provide indirect lighting other than a distant light as well.
I can't remember if this option was available in DS3, but in DS4 you can go over that 200% value if you want. Click the little icon of the gear at the upper right corner of the Parameter slider and select Parameter Settings from the context menu. Change the Max value to whatever new maximum value you want (2000% for example) and press Accept. I don't actually know where the limits are, if there are any, but a random test does indicate 2000% is noticeably brighter than 200%
I have it, the pro version at that ... I just don't like it or know how to use it ... lol. I'll tr the secondary light and see if that does it.
:D
You could also copy one of your point lights, and turn shadows off for that while leaving them on for the others. That's what I usually do when I want non-black shadows without using an environment light.