New to DAZ3D and my first render looks Awful
 michael_7654011a
Posts: 13
michael_7654011a
Posts: 13
in New Users
Below is my first ever render and here are some questions I have
1. What is wrong my settings that the final render still looks pixelated and still has white dots everywhere
2. How can I make the skin not look"plastic"
3. How do I make the laser sword be more "glowing"
4. How can I work with lights and not be afaird of them LOL
Any other advice would be greatly appreciate
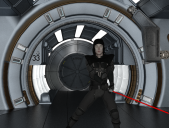
tomo 1.png
989 x 750 - 1M
Daz 3D is part of 
Connect
DAZ Productions, Inc.
7533 S Center View Ct #4664
West Jordan, UT 84084
Licensing Agreement | Terms of Service | Privacy Policy | EULA
© 2025 Daz Productions Inc. All Rights Reserved.
Comments
Could try:
1) must buy in DAZ Store: use one of the Studio Lighting Rig sets up to and choose a configuration it had to light the fellow to the sire of the laser sword.
or
2) Free: Or better yet to make the laser sword glow and to make dramatic lighting on the guy go into Surfaces for the laser sword and change the emmission for the light beam to red and turn up the luminance to some huge unrealistic number, like 1,000,000.
So 1 or 2 will do the job to make the guy look less flat is mostly due to strong light source coming in to the target from an angle such that the entire target is no evenly lit by the very strong light source.
Looks real good in my opinion, but you probably want a bit more life and light, contrast etc. in the face... maybe this can be helped with a better HDRI file?
Absent having to buy the studio lights -- which is what I personally have, and use, and recommend -- you might want to try changing the light dynamics in other ways, like how about just rendering the figure alone, separately 3DL with more dramatic lighting. Ergo add three distant lights and play around with their position and intensities, and shadows on/off sort of thing. Save as a .TIFF file, open in an image editor, copy and paste into your corridor scene and adjust the transparency of the new layer to 50 percent (say). Cut away most of the 3DL information leaving some "hints" of more dramatic, slightly more intense lighting, like on the face of the hooded figure. Note that to ease this process your image editor ought to support pasting back in exactly the right place, otherwise you may have to fudge back and forth a bit with the arrow keys until you hit the sweet spot.
I have not played around with much swords and glows but that sounds like a good idea from nonesuch00. Here is a render that I made to for another, unrelated thread. In the modified version I am bringing in all sorts of holography-like blurs and edge filters to bear on the original scene. Some of the information rising to the surface of the ghostly figure is indeed 3DL... nobody got hurt! You can kitbash and "mix and match" all you want.
For the skin, play with your glossiness and specularity settings. As a starting point I would dial down the glossiness to maybe half what it currently is and also darken the specularity to 'tighten' the highlights. Render, tweak, render some more. The white pixels could simply be the result of everything being so shiny and brightly lit. Could also be the render has not run long enough but that would depend on which renderer youre using.
For lighting, to learn I would say start with a single light, then work your way toward a 3-point lighting setup as far as general understanding, and I personally favor using spotlights or meshlights as it gives me control of the focus of light and falloff to the periphery of the image. As far a not being afraid of lights or whatever, just render render render. Cant learn if you don't screw something up.
The glowing sword requires light emission, but how depends on the renderer (iray, 3delight, reality, etc).
These are very general tips independent of whatever specific render engine you are using. And if thats a first render in any 3d program ever then you are doing pretty well. But learn the surfaces for whatever renderer you favor, once you have a grasp of it lighting will be the thing that makes or breaks your render:) But if you do not understand the surfaces, lighting will not be able to fix that. I would also consider struggling to understand lighting some before rushing to buy prebuilt lighting systems.
So since I have nothing going on at work at the moment.... in your scene, maybe have a single spot approx 20 feet in front and to the right of the guy, just above eye level shooting across the scene and slightly down so the shadow of his nose plays across his cheek. The center of the light cone should be hitting him right in the face. And point his eyes at the camers OR make it look like he is looking at somethign past the camers, and maybe give him a bit of an expression but dont overdo it, a little goes a long way. And it looks like maybe theres light panels around the door, adding emission to those might look cool. But even without, one spotlight and the emission light from the sword to start with. Build up from there. I would tell you how to do the light emisison but I do not use 3delight or iray so I cannot help you there. Then theres your camera settings.... also dependednt on your renderer.
I suspect for the lightsabre you want a fuzzy glow around it. This can be done with a foggy cylinder (volume) and light emission from the sword, but honestly, you might find it more practical to just do this as photoshop postwork.
Oh, man, that looks AWFUL!!
No, seriously, it's pretty good for a first try. D|S (and any 3D) isn't really pushbutton art, no matter what people might say. It's just as hard and challenging as any other kind of artistic expression. In general, and in no particular order:
1. Be sure to apply the Iray Uber shader to all surfaces of the scene, if they aren't already. Many scenes, characters, and clothing load with the 3Delight shader shaders applied. While D|S will autoconvert these to shaders that Iray can use, you have very little control over how things will look. So, find the Iray Uber shader and apply it to everything. The textures should not be affected.
2. The stock Uber shader won't make great-looking skin. For this you could experiment for hours on end, but it might be easier to find something ready-made. Here the better solutions are character-specific -- what works for an M4 character might not for Michael 7, and so on.
3. There are no shadows in this scene. In space no one can hear you scream, but there are still shadows, and it's shadow that imparts a look of realism to the scene. Forget how Stanley Kubrick lit 2001: A Space Odyssey. If you're not careful, the overly even tone of these kinds of scenes can break every other nod to realism that you work on. Good lighting is probably the most difficult thing to achieve in 3D. This is why the big animated features have 30-50 "lighting coordinators" working on the movie.
Rather than light this with some form of ambient source, such as the Environment Map, add just one or two spotlights -- a key and a fill -- and position them off-axis from the camera. Start with the fill 50% as bright as the key, and experiment. Since this can be exacting and frustrating to do as you wait for renders to show you the result, you might find a ready-made solution a worthwhile investment. Still, your best work will be when you make the lighting setup distinctly yours.
4. Others have given you suggestions on the glow from the light saber. Worry about that last. As Ostadan mentioned, you could easily add this in Photoshop or GIMP, but the other parts of your scene are much harder to fix in postwork.
5. Finally, little specs are caused by under-rendering. The dark specks are unconverged pixels, which are pixels that don't yet have enough samples to them for Iray to judge the proper color and tone. The light specks are fireflies, typically caused by excessive hoighlights (such as the glossy floor). These should disappear by the time the render is done.
Library -> Shader Presets -> Iray -> "Daz Uber" and "Nvidia MDL Examples"
These are both very good places to start when looking at shaders for the items in your scene. Keep in mind that most items in your scene have more than one material zone on them. Your weapon probably has 2 or 3 by itself (the hilt, and the blade). Make sure when applying generic shader preset that you select the material that it is intended for (If you just have the model selected and nothing highlited in the materials window, nothing will happen when you try the preset).
Something you probably want to experiment with is setting the "Emissive" shader to materials in your scene labeled as lights, then mess with the settings till you have them dialed in to your liking.
Another helpfull hint especially when working with shader based lighting. You can get a quick preview of your work so far by turning on Iray in your preview window. Though you probably do not want to leave it on all the time because it will max out your CPU and GPU usage.
Here is a good example of shader based lighting on a project that I'm working on.
Check out the new user contests - even if you don't enter, it's a great place to get feedback and a wonderful learning environment.
They are not judged on the best render, but rather on most improved and other categories like that, so even an absolute newbie can win.
So I've been playing around. Trying to use advice given. Still getting pixelated in the render but with some lighting, some photoshop work and Topaz labs to "cool" things down. I like the look. Just got to figure why the render isn't completing in certain areas.
Also added image without the Topaz rendering effects
The grainy effect that happens, I believe, is because the rendering process goes for a specified time limit. If it hasn't done enough passes then you get the speckled effect. I think if you add more lighting it improves the quality more.
I have to say that these renders are a whole heap better than your first. You're getting the hang of it, it would seem.
To improve this image a little I personally would look at the pose again. I think the left foot needs putting on the floor and I think that the sword in his right hand isn't at the right angle. It might only be off by like 1 degree or something, but because the sword is that long, it looks limp.
Don't let these bumps in the road deter you though. The program and community is well worth the perseverance.
Nice job. Consider adding more light on him - I recommend a catch light - a small spot or mesh light focused on his face to bring his face/upper chest out more (but drops off at the edges so it does not light up the rest of the scene). This will also allow you to produce the bright cornea reflection that helps bring the character to life. 3dlight bakes in reflections for this but if you are using iray it should be possible to create real catch lights in the eyes as its a pbr renderer but iray may have its own way of doing this, dont know as I use reality which requires removal of all cornea textures - bump, reflection, etc. Maybe iray works basically the same way. I saw comments in these forums about the existence of threads discussing how to do catch lights with iray but could not find you a link, maybe somoeone else can help.
And seconding l_stowes pose comments - yes theoretically the foot could be caught at that moment but in practice it looks odd, in between but awkward. The right hand sword should at least be slid left a bit so its resting against the palm and no light is coming through the grip, plus stowes rec about the angle of the dangle. The graininess is render noise, should clear up if the render runs long enough.
MS5/Clipstudio Paint is a very good option for postwork as well; much cheaper than ps, and much better documented than gimp.
You can increase the rendering time to get rid of the specks. Go to the render settings tab then go to progressive rendering. Increase max samples and increase max time. If something is taking a long time to get rid of the fireflies I increase those to the max and let it run. You can stop before its done once it gets to the point that the fireflies are gone and you are happy with how it looks.
Also if you want to light up his face a tiny bit you can add a linear point light in front of it with a very low intentsity to just show his features slightly. You can increase and decrease the radius, the intensity and the color under the light tab.
I'll echo Ice Dragon Art and the others: Though dark and moody is good, as they say on Broadway, the public paid tickets to see you, so be sure they can see your face. In these renders the character is almost "invisible" because his face is in complete shadow. Since your scene is otherwise static, the only emotional pull you'll get is from your actor, so be sure it's lit well enough and/or in a way we can see the drama you're trying to achieve.
As long as you're not using volumetric effects (fog, etc.), you can put a spotlight (I prefer these over point) a foot from his face and narrowed to just his eyes. Hide the emitter so the camera won't see the light source, color the light for dramatic effect, and use the simple face and expression dials to give your character a little more impact.
When this is all done, you can look to ways to improve the rendering itself. The grainy look is caused by unconverged pixels, where you're either quitting the render too early, or it's passing its default 2 hour time. There are ways (plenty of posts in the forums for how) to increase rendering time.
Here's an update on the original render. Plus another one I worked on.
Thank you all for the advice so far. It's been extremely helpful
Looking good:)
Very cool images! :)
Your light saber is somewhat better than my first attempt at a similar, laser glow. I was just playing around with putting a bit of zip on this primitive shape I made in Hexagon, or giving it some pizazz and it suddenly turned on me, radically morphing into a radial somethingerather... so I rendered it several times in different colors, and mated it to a black primitive cylinder. I decided to call it a deep space engine, like on a starship.
Playing with it further, I added some Iray special effects from InaneGlory and DestinysGarden, in the DAZ store. Flame on!!!
Note: in the first image, all of my added "effects" were painted in, using an image editor. In the second image, the exploding ray-like things coming out of the center of the red circle are a physical, transparent prop (looks like a Christmas tree ornament or something) positioned in front of the main prop, and the prop has a transparent shader applied. Then I composited the rendered layer with the exploding rays back down onto the first image. Ditto the purple-ish "flamey" things on the right - this is a third, physical model, transparent and you can thicken it or stretch it out etc., to jazz up a light sword or a ray gun or fire coming out of a dragon's mouth etc. If I'm not mistaken these sorts of props can even be used as guides for a covering layer which you would paint in with something like Ron's wisps or digital energy (this is a link to a real product in the DAZ store, eg. brushes for Photoshop!) and so on, and when you're done you would simply delete the guide layer. Ha.
Related... more rays in the store - https://www.daz3d.com/sy-energy-beams-iray