Iray shadow noise
 crashworship
Posts: 223
crashworship
Posts: 223
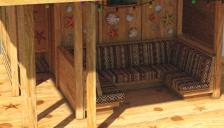
I'm using Iray optimized lighting and figures but one thing that I've noticed from my renders is a significant amount of noise within the shadowed areas of my renders: This example shows an Iray optimized prop, Paradise Lagoon, sold on the Daz Marketplace, but I routinely see this with Iray optimized Genesis characters as well.
I've been a professional photographer for over 30 years and, in order to get the most dramatic and realistic results from my 3D renders, I try and use lighting similar to what I'd be doing if I was making a photograph. Often times, this would mean backlighting the subject and using a fill light to reduce contrast. I've found this to be nearly impossible with Iray. Using Reality and Luxrender gives much better shadow rendering but there are other signficant communication problems between Studio and Reality/Luxrender, specifically regarding Daz character skin materials, that using Luxrender to be problematic.
There must be a solution for this. Obviously, direct frontal lighting would take care of it but the results would be significantly less interesting.
Daz 3D is part of 
Connect
DAZ Productions, Inc.
7533 S Center View Ct #4664
West Jordan, UT 84084
Licensing Agreement | Terms of Service | Privacy Policy | EULA
© 2025 Daz Productions Inc. All Rights Reserved.
Comments
The noise comes from not enough samples to each pixel over a particular period of time. To increase the samples, increase the light reaching the scene. You can then adjust the light balance with tone mapping to return the scene to how you want it. You don't need to change the lighting itself, but try boosting the light by 4X or 8X, and compensate accordingly in tone mapping.
You mention you're a photographer. In that case, don't let pre-conceived notions lead you down rabbit holes. Iray is not a camera, and it's not film. While there are photographic-like settings in tone mapping, they are simply reciprocal values to arrive at the same exposure setting. None control image effects (DOF, blur, grain size, etc.) They're just fancy terms for what you can do in Photoshop with adjustment layers (but with more latitude when working with an 8-bit image).
What got you to that point in the image posted...did the render finish?
If it did, what 'stop' condition did it reach? Time? Convergered ratio? Iterations?
Basically, no matter which one stopped it, that render isn't 'finished'. Lighting like that, will take a long time to finish...especiallyif it's hitting the 'time' limit first.
Also, what is your lighting set up?
Using the tone mapping/exposure controls to BOOST low light will do nothing to improve times. To speed up things, over all light levels need to increase and the tone mapping controls can be used to lower the over all exposure.
Sorry that I have to contradict.
Or you have to define "increase of light levels".
As the render engine is not counting photons; it calculates rays (especially scattered/bounced light), the relation between directly and indirectly (shadow) lighted areas mainly rules the render time. The complexity of the surfaces is an addition to render times.
A short test:
As obvious, crashworship used a simple sunsky.
I did a comparison test and increased the light level by a factor of 100. I chose to set Evironment Intensity from 1 to 100 to keep the relation between sun and show intensities. This is the base condition for photography / photorealistic renders. So on the other hand I had to reduce for example the ISO from 100 to 1 to get the same brightness of the exposure.
Attached you see the simple setup.
Result:
As well as for Env=1 as for Env=100 the (CPU-only) render needed round 9 minutes. There was a small difference of 15 seconds at the expense of Env=100. But this could be due to the Windows7 System.
qed
I am aware that settings in Iray that mimic those of a camera are largely superfluous and all arrive at the same thing which is to either lighten or darken the image. In fact that's one of my biggest issues with physics based renderings. An f/4 aperture at 250th of a second with a film speed of 200 is relatively meaningless with a render whereas in camera, those settings can and do effect the image substantially based on a number of circumstances. Often, in camera, those settings are part of the creative process and are used selectively to create interest.
The point isn't making settings during the render which would mimic camera settings. What I'm after is approaching lighting the same way in a CG 3D image the way I would if I was making a photograph. For me and the way I make photographs, the most ascetically pleasing images are not made with a direct light source. Lighting doesn't need to be complex, but it must add drama and impact, so variations between light and dark within the image are what I want and I like to focus light selectively where I want it and keep if from areas that I don’t want it. Because of this shadow noise issue in Iray, I'm finding that difficult to achieve. I have tried to correct this using the tone mapping settings and it hasn’t worked. As I’ve said, this doesn’t seem to be an issue with Luxrender. Shadows seem to render much better with it and I’d use it if it wasn’t for this materials miscommunication problem that I get between Studio and Lux.
Well, those are good questions. They are those I ask myself as the render progresses. These renders usually take hours and Studio/Iray stop it at some point. And that's it. I can't restart like I would be able to with Luxrender. So at some point, the software simply kills the process and offers me a save option. I usually do because after hours of waiting, I don't want to lose the progress but what I'm saving is far less satisfactory than I want. I accept that there is something that I don't understand when making render settings. Clearly that's the case because I'm not getting the result that I want.
Well yes, there's a bit more math there than my History/Fine Art degree can comprehend but I do see your point. This is a small section of the total image, selected only to show the issue that I'm having. Maybe a little more context is in order. This prop was placed in a scene with TerraDome 3 for Daz Studio as the environment and light and I used the Iray optimized materials and settings. I'm guessing that there was a lot of information being thrown at Iray while rendering. While the rest of the image rendered fine, it was just these areas which were in shadows that I had the noise issue. After many tries and a great deal of tinkering with Irays settings, I am unable to correct this problem.
I am CPU rendering so it's just not practical to let a render run 24/7 for an entire week. I am trying what was suggested in this thread. I introduced studio lighting setup into the scene that was sold in the DAZ Store. Well OK, but 24 hours later and still significant pixelation and I can tell it's going to need a week to get rid of that to my satisfaction, which to be fair, less picky than most people's with their nVidia cards.
So I bumped up the 3 emitters in this studio lighting by a factor of 10 but left the reflectors alone.
Then I changed the ISO from 100 to 10.
And then I notice that when I did change the ISO mapping from 100 to 10 that changed other tonal mapping values in the tonal settings automatically.
Does that matter?
I've since changed the ISO to 25 (and the other tonal mapping were again auto-adjusted) but it's too early to say if it's going to render without much pixelation in 24 hours. 25 ISO looks like it might now be too bright with the 3 emmitters not at 10x fold values. It's in a small room with one window at 20:30 on Jun 22 so it is mostly dark outside the room.
All three stop conditiions are adjustable...to 'nearly forever' type settings.
Render Settings > Progressive Rendering:
For time, in seconds, go to something like 172,800. (Max Time)
Set the number of iterations to something like 100,000. (Max Samples)
And Converged to something like 99.95% (Rendering Converged Ratio)
But, to be meaningful, you'll need to find out how long its running and what is stopping it now...which should be listed in the log file (Help > Troubleshooting > View Log).
My points about not confusing Iray with photography is that there are many exceptions that make no sense, so it's better to approach it with an (almost) empty slate. Use your photography experience for the artistic side, but spend some time experimenting with Iray to find how its technology parallels your vision. The trick is to find your own tricks that work.
Likely your scene is problematic because the shadow is entirely illuminated by indirect lighting. That's a major bugaboo with Iray, and gives everyone fits. You're doing nothing wrong. There are several biased work-arounds for it -- architectural sampler, light portals -- but in general, such scenes will give you the biggest problems. Depending entirely on how you've lit the scene, there are some techniques you can try in order to throw more direct light into those shadow areas, giving Iray more samples to work with. As that will affect the light/dark tonal balance you're trying to achieve, you'd need to compensate by methodically increasing the main light, while adjusting tone mapping to return to the exposure levels you want. This part is similar to real photography, except that Iray is far more sensitive to underexposed areas than film (or digital imagers) are.
You can also consider "cheating" (don't most photographers do this?!). Go ahead and light the shadow, then bright it into Photoshop, duplicate the layer, add a mask for the shadow, and adjust the curves or exposure to create any shadow you want. You can use the same layr masking technique to selectively denoise the "grain" to a more satisfactory level.
You compare Iray to Lux: the difference here is intent. Iray is intended as a "push button" PBR renderer. There are relatively few exposed controls you can vary. It may possibly be that to achieve what you want you'll need to use a different renderer that provides more manual control. I'd personally spend some time trying to game the thing before abandoning it, though. You can often get it to cooperate.
For those experimenting with adjusting light output and ISO: To double or half ISO you double or halve its value: 100, 50, 25, 12, etc. A difference of 100:10 is not 10X, it's (roughly) four stops. You then can reciprocate light values by doubling or halving the luminosity: 100, 200, 400, 800, and so on. It's more accurate to calculate it this way.
Thanks and I noticed that there are locks on the tonal mapping settings I can lock & unlock to keep the changes of one value changing the others in tonal mapping - I guess in that sense it does work sort of like a Point & Shot camera.
I do indeed do that, introducing a plane prim and then making it emisive which I will commonly use as a fill light. Often, I will use more than one of these and then direcet them sellectively at a poorly lit subject to allow for a little more detail. I've discovered that adding Reality's mesh light props to my scenes and then making the light plane of the prop itself into an emisive surfuce does create a nice fill light and you also have some of the useful other elements of the prop, snoot, gobo, handle, scale, etc, as light controls. For less complex scenes or for images that are more tightly composed, this works quite well. The problem with adding emisive fill lights, whether plane prims or props like mesh lights, is that you've also introduced more for Iray to think about and thereby greatly increase rendering times. This is especially true of larger scenes, such as the one used in the example.
One of the biggest issues with Iray optimized lighting I think, such as DemensionTheory's light probes or the Atmosphere lighting from the TerraDome 3 series for Studio, is that these light sourses don't seem to be selectable in the light pane of Studio. Usually, there are content library utilities which enable one to change intensity and angle, but you can't simply go into your scene, select the light source and then make parameter adjustments or intensity/temp/lumens adjustments within Studio's Light pane. This is another flaw I think with Iray lighting. It's often vague and requires much trial and error which, given enough time, is correctable but that's the problem. Very, very time consuming. Simply adding Iray sun light to a scene seems more mystery than science. I would have prefered to lower the angle of the light source to illuminate better the shadowed areas but because that light source isn't individually selectable and parameter adjustments are not possible, I can't do that. So, I've been using Reality's Sun and Sky light, which is selectable and adjustable, but an atmosphere dome can't be used because it blocks the sun light. So, therefore, I lose the sky that I want and am left using the dome function in Iray render settings as a replacement, but again, not visible in the texture shaded scene area of Studio unless I'm doing a test render, also very cumbersome and time consuming.
Iray is a great addition to Studio but this first generation has many flaws. I'm hopeful these will be addressed with updates, which is why I'm pointing them out here.
Most of these "flaws" have been well covered in posts here, and while there's a lot to read, these subjects have been addressed, with ways to deal with them. It's pretty easy, for example, to set an "aimable" light source for the sun, select it as the Sun node, and then select it in the view panel so you can accurately aim the sunlight into your scene. There's nothing hit or miss about it. Granted, this is not something that's heavuily documented, but the facility is there, and numerous posts have talked about it.
I don't knoiw Dimension Theory's light probe product, but I understand the TerraDome 3 series is based on HDRi's, in which case there are no "light sources" to select. The light comes from the HDR image, and is best thought of as available light. That doesn't mean the light is immutable. You can manipulate the dome to alter light direction, and you can even edit the image itself (with proper 32-bit editing software) to add, remove, and change the illumination. I do this regularly with HDR images I use.
Mesh lights for fill are okay if the plane has very simple geometry. The light is naturally diffuse. Alternatively, you can use a spot light with its emitter enlarged. It becomes an infinitely sizable softbox. As the spotlight is a built-in Iray light source, it tends to be more efficient. You can add several as area fills without increasing too much render time.
Again, do some reading and you'll find solutions to these sorts of problems.
if they are using emissive surfaces, then the lighting controls will be in the Surface tab.
I am using a Studio Light Setup from the DAZ Store & while the drama of the lighting is liked by me, still even after light magnitude changes of blow-out proportions the pixelation problem remains - Now oddly the pixelation problem is less so in the deeper shadows and more pronounced in the mid-range transitional areas so that changed at least.
I will try the techniques j.cade does. I will buy her Painterly Lights and render to Canvas and send the results though several iterations of Photoshop Essentials or Gimp noise filters. That mean I will have to go for a more painterly type of renders but that is fine I like those too - key thing is the light is distributed believably. Maybe next year I will buy a new desktop PC with nVidia video card & again attempt more realistic renders.
Also, excitingly by next year Octane will be part of Unity Personal Edition for free and maybe this open source ATI PBR renderer will be integrated in DAZ Studio, Blender, or Unity.
http://www.daz3d.com/iray-light-manager-pro
Now that looks good way to coral those scattered settings.
In some cases, no. There are no emisive surfaces so the only control is from the environment pane within the Iray settings panel. As such, there is no preview available so the only way to guage what the light is doing is by preview rendering. This preview render must progress a pretty long way before one gets a sense of what the light is doing and how it's effecting the scene. Even with emisive surface lights, the texture shaded scene window won't show any light from it hitting the subject as you would with a more traditional Studio point/spot/distant light, so again, preview renders are necessary.
In your work you're bound to settle on the same two or three HDR images (on edit: for lighting). The first thing I do whenever I get a new image I think I might use is produce a quick series of sample renders using one or two primitives as standins. I then set up some presets at different dome rotations.
Iray's dome is not a part of D|S (same with emissive surfaces), so you need to render in order to see its influence. D|S really doesn't know anything about how Iray will render a scene. My hardware doesn't allow for effective preview rendering, and maybe some day I'll have a super-fast rig that displays this stuff in real time. Until then, creating some cheat sheets seems a good alternative.
With emissives, I tend not to use them unless they are for practical in-scene display, but when I do, I've had enough experience with them that their influence is predictable. I will admit it took a lot of practice and experimentation to reach this point. But then, I remind myself it took me 10 years to master photography and darkroom work before I felt I could get a job doing it. This was back in the 1970s when everything was still film and stinky chemicals. Everything good takes time. And then the technology changes, and you have to start all over again...
This is the easiest one I use to avoid noise on a sunny day:
https://community.renderman.pixar.com/article/107/luxor-jr-panorama.html
This is the easiest one I use to avoid noise on a cloudy day:
https://community.renderman.pixar.com/article/705/hdri-lac-dannecy.html
Of course I just stick a person model with the HRDI Dome rendered with no architecture or anything to create shadows so you probably will get pixels in shadows with these once you do that.
@crashworship "I do indeed do that, introducing a plane prim and then making it emisive which I will commonly use as a fill light."
While a single plane emissive primitive isn't a big render penalty, you can also use geometry on a photometric spot to mimic softboxes and get the kind of control you expect in a studio. Just remember that Daz Studio's units are cm.
Although it was made for modo users, there's nothing here, as far as I can tell, that wouldn't be applicable to Iray renders http://www.pixelfondue.com/blog/fireflies
Fireflies are a actually little easier to remove with a (Photoshop or other) filter, because they're white. The un/underconverged pixel "noise" can be more difficult because it's more than one shade of color. Still, there are some general filters that will work without blurring it up too much.
For lurkers: I've found it's best to do manual touchup using a second (top) layer, with a layer mask. Set the mask to black. This blocks that layer from showing through. Apply the filter(s) to the second layer. You can now draw white into the layer mask to reveal just the parts of the filtered image you want to show through. Remember that you can vary the opacity of the white to alter the strength of the filtered layer.
Sorry, yes - I was confusing fireflies and noise.
One option is to render larger than you need and downsample, effectively creating extra detail with the intention of sacrificing it, but that depends on how much slower a larger render is (and whether your current size allows the headroom for expansion).