Dem bones, dem bones, dem aligned bones.
 ghastlycomic
Posts: 2,531
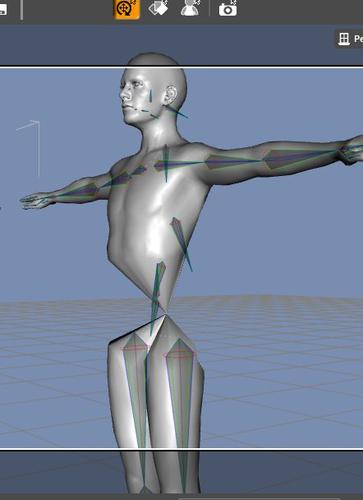
I've been trying to make an actor with a MakeHuman figure, but I've been having some troubles with the rigging. I've exported the figure as a Collada with Rigid Rigged.
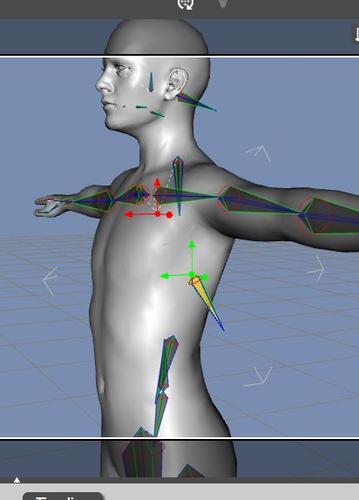
Then I auto align the bones in the joint editor and that fixes about 90% of the rigging. I have to adjust the toes and the right hand finger tips manually but that's no problem.
The problem is some of the bones don't align at all to their start and end points. The start and end points are where they're supposed to be but the bone points in the opposite direction.
The second problem is when I save the model as an actor and then load it again, the waist ends up collapsing around the spine.
Any idea what I'm doing wrong?


saved_figure.jpg
442 x 608 - 30K


bones_1.jpg
412 x 574 - 31K


Comments
Bigger pics would be nice...
But it looks like one or more of the bones, in that area are reversed...so the parameters are more likely inverted...let's say it's supposed to be +1 Y rotation, it's coming in at -1...
Also, I've found sometimes, auto align and auto snap won't work for 'big' moves...it's better to manually drag the bone into 'close' and use the manual snap/align to get it lined up.
What surprises me, is that there isn't a 'donor' rig for the latest MH meshes...
The pics are full screen resolution, I just cropped them to the relevant parts.
I've tried manually aligning the bones but there are still certain bones that won't align. I checked the rotations and even tried changing the rotation order but they just won't align. They still seem to work properly, they just don't look like they should, so go figure.
I still can't figure out why the saved actor has a collapsed waist like that. I've never had that happen with another figure, but no matter what rigging I use the figure ends up with a collapsed waist.
It looks as if all of the trunk nodes are reversed - is the hierarchy OK?
Yeah the bones are all stacked okay. If I change the +/- setting of the Y and Z rotation for each bone the align properly.
There's something with the Hips bone that is causing the collapse of the waist. If I delete the hip bone and save the figure then the figure loads without the waist deformation, but of course the leg joint movements are all messed up. I haven't been able to figure out what I need to set to what to get the hips to align properly in a way that won't cause the waist to collapse.
It also seems that the waist is collapsing to what ever point the starting point of the Root is.
Hi...
Unfortunately there is no direct way to fix the collapsing mesh from occuring after saving to a figure... :-S
But there is a work around, and I do mean work around... :roll:
Import the .dae figure into DS... Un-parent the Root from the Scene Root and delete the Scene Root...
Reposition the Root to the floor
Now in the Joint Editor adjust the bone rotation orders... all the bones along the vertical line of the figure should be YZX (head to toes and tongue 1 and 2) leave the rest as XYZ
Then in the Joint Editor Options Menu select Align > Align All Bones then Memorize > Memorize Figure Rigging
Now the work around... %-P
Re-Export as Colladae (.dae) **this is important, otherwise the rig will seperate from the mesh... :ohh:
Clear the scene and Re-Import the .dae figure and un-parent Root from Figure Root...delete Figure Root
Now Export as FBX making sure to check Figure and that it shows in the lower box as a selected figure
Clear the scene and Re-Import the FBX figure... now you may notice that some of the bones do not look quite right... your not seeing things... they have moved...
Now save as a Figure Asset
Clear the scene and load the figure from the Library... the mesh should now be intact and you can go back to the Joint Editor and adjust the bones...
Just remember to Memorize the rigging to set them... also the figure is only using General Weight Mapping, if you prefer, you can convert to Tri-Ax...
Another thing about the Make Human rigging is that there are no Face Groups imported into DS... the joint selection boxes are therefore centered on the joint center points... if you want the bounding boxes to encompass the bones and mesh, then you will need to create the associated Face Groups in the Polygon Editor...
One last thing, you will also need to set all the limits and label the rotation names... and some editing to the weight maps wouldn't hurt...
Well, like I said... it's a work around, and the only one I have found other than exporting as .obj from Make Human and rigging from scratch... ;-)
Hope this helps... :)
Thanks. I think I might just bite the bullet and rig one from scratch, that way it will be better scaled to work in Daz too.
I made one figure which I scaled and posed as close as I could to a Genesis pose, exported the .obj and then just fit it to a Genesis figure to rig it. Now the only problem is I can't use MakeHuman figures as morphs unless I also pose them as Genesis figures.
The nice thing is the base figure will be compatible with Genesis poses and animations.
Is the only way to set surface groups in Daz, or can I set surface groups in Hexagon too?
Hexagon will do material zones.
That I knew, but can I turn those into surface groups for rigging?
Woot! This helped greatly. I now have a MakeHuman basefigure actor. Thanks a tonne!
Hi...
Woot! This helped greatly. I now have a MakeHuman basefigure actor. Thanks a tonne!
Your very welcome... :) and I must say, I commend you for going through all that.... ;-P
The collapsing waistline was driving me nuts and I was determined to make it work, even though I could have re-rigged it in a fraction of the time it took to figure that whole process out...
If you want to use morph shapes from Make Human on your new figure, just make sure you use the same scale settings in Make Human that you did for the original colladae export, and export as an .obj
Then in DS import the .obj and move it to the floor and then re-export as .obj... Then you can use Morph Loader to load the morph...
Have fun... :)
It seems that MakeHuman's Mesh for an .obj is different from its mesh for Collada. So if I want to make a morph then I have to export from MakeHuman has a Collada, import into Daz, export as an obj and then use that as a morph source. This is pretty fun to play with.
Okee Dokee, I got the Rigid Rigged figure up on Share CG so if anybody else wants to use MakeHuman figures in Daz you don't have to go through all the hoops to do so.
However, this is the very first time I've ever shared anything in the DAZ format. I think I have included all the necessary files to make it work. I don't know. Daz has such a convoluted directory system that I'm never sure of anything when I'm working with it. It would be nice if the software had an "Export/Import Product" function that just automatically puts everything needed into and out of a zip file. If someone can double check for me that would be great.
MakeHuman Rigid Rigged For Daz Studio
And again sooooOOOOoooOoOOooo many thanks for helping me get this figure working.
Hi...
Haha... your right... :) sorry about that...
Make Human has a different vertex count for the Colladae and Object exports... and whats even funnier is that importing in the MH .obj into DS and then re-exporting as an .obj creates a different count from either of those...
But exporting an .obj from DS of the Colladae import retains the correct count...
The work around just got a little longer... lol... %-P
Have fun... :)
Hi...
Just downloaded and tested it out... all the required files are there...
I noticed that you didn't reposition the spine and chest bones or set the rotation names and limits... was that by choice?
Anyways, good job... looking forward to your next venture... :cheese:
nicci... :)
I didn't notice the spine didn't align. I wanted to leave as much of the file as is as possible because I thought if I changed things too much then the rigging might no longer be compatible if anyone was using rigid rigged BVH files with it.
Hi...
Okay that make sense... I just mentioned it because the way the mesh bends in on itself with the bones positioned so far back...
Although that is more anatomically correct in position, the limitation is, there are only a few bones to bend... adjusting the weight maps could probably ease quite a bit of the bending...
Anyways, again... great job...
nicci... :)
I think what I'll end up doing is creating a new figure that has Genesis compatible rigging and proper weight maps. This is kind of a stopgap measure.