BIt of a newbie question
 Steelblade
Posts: 54
Steelblade
Posts: 54
How do I get my renders to look like the previews? My workspace is brightly lit and clear. My render is dark and grainy. Makes no sense.
Daz 3D is part of 
Connect
DAZ Productions, Inc.
7533 S Center View Ct #4664
West Jordan, UT 84084
Licensing Agreement | Terms of Service | Privacy Policy | EULA
© 2025 Daz Productions Inc. All Rights Reserved.
Comments
well, you render the light, you have attached to your scene. Do you still have your headlamps on ?
That's supposed to be under render/render settings, but there's actually nothing there. I click on it, nothing happens. No menus, not extra side bars, nothing with the headlamp control.
There is a button for whether or not to use scene lights. That one can change the appearance, but it doesn't match the output. I get a bright clear workspace preview no matter that button's setting and a dark grainy render.
I don't know how they render the shop previews, but to get a simple clean render, you don't need any lights at all. You can light your entire scene using a HDR environment map.
Render Settings -> Environment:
Environment Mode: Dome and Scene
Environment Map: DTHDR-RuinsB-500.hdr
I think those are the default settings.
But, if you're rendering insided a closed area, like a room, with walls and a ceiling, then all that is going to block the incoming light. You can just hide those objects if you want light to come in stronger.
That's my newbie perspective on lighting. :)
Some reading for you and then ask some questions about what you don't understand :)
http://docs.daz3d.com/doku.php/public/software/dazstudio/4/referenceguide/interface/panes/render_settings/engine/nvidia_iray/environment/start
http://docs.daz3d.com/doku.php/public/software/dazstudio/4/referenceguide/interface/panes/render_settings/engine/nvidia_iray/tone_mapping/start
http://docs.daz3d.com/lib/exe/fetch.php/public/read_me/index/21981/21981_quick-start-guide-to-the-iray-dome-and-the-use-of-hdris.pdf
To get the render to go longer to remove the noise then go into Render Settings/Editor/Progressive Rendering and try these settings that I use (everybody has their own settings these just happen to be mine).
The Max Time setting is 7200000, I just noticed it isn't showing the full number :)
My render settings option under the menu doesn't work. There is no response from it.
My ability to place lights is iffy. Sometimes I have a button for the new light, most times I don't. I check under the lighting tab, etc, but it comes and goes and I'm not changing the menu options.
This may not be a render problem. I am running the same version on my desktop and laptop. On my laptop it runs, but slowly of course. On my desktop, it's getting downright wacky. I tried adjusting a light, but while my mouse was hovering over the red X axis bar to slide it, the whole prop started moving instead. And not on the red axis, on a completely unrelated tangent to all 3 axis. Then the mouse pointer disappeared. Etc.
Whackadoodle. Is it my video driver?
It is extremely difficult to give you an advice what your problem is caused by. Please update us with some basic information.
What DAZ version. What render engine? If Iray, what Environment Mode (Dome/Scene, Sky only ....)? Do you have attached a lightsource by your own and which one ( Distance- Spot- Point Light) ? What mode is your viewport set to (Texture shaded, Nvidia IRAY ..) and trough what do you look on your workspace ( Perspective View, other Camera, a lightsource ) ?
Edit: since you think that your light adjustments does not do anything, I would suggest to create a simple scene ( 1 element on a simple plane and appley the correct shader on both elements according to the render engine you have choosed) to see the ground shadow. Shadow can help you allot and a render to verify if something has changed takes only seconds. You know meanwhile that lots of adjustements are visible just after you have rendered the scene.
4.9 public build, on both laptop and desktop. The strange mouse behavoir is only on the desktop. Nvidia Iray is the render engine on both. Infinite Spere. There is are two lights in the scene, light side L and light side R. Both are turned all the way on, full brightness. The new light buttons are on the desktop (distant point, spot, etc) but not on the laptop. The tools settings appear the same on both. Not sure how to find the viewport mode, but both are in perspective view in the little box at the top.
You say both light are 'turned all the way on full brightness' is that the percentage slider for the lights? Do you have Photometric turned on under the light setting? The brightness setting in Iray works but that isn't how you increase the light output from the light. That is done with the Lumens setting when you have Photometrics turned on.
IMPORTANT SETTINGS THAT PEOPLE OVERLOOK OR DON'T KNOW ABOUT!
Render Settings Tab -> Editor -> Tone Mapping
Shutter Speed : The lower this setting the brighter your scene will be.
F/Stop : The lower this setting the brighter your scene will be.
Film ISO : The higher this setting the brighter your scene will be.
These settings are meant to simulate how light is captured in a real life camera. Shutter speed is a fraction number (1/x of a second), so the larger "x" is the smaller the fraction. F/Stop is how narrow the apperature closes up on the Lens, F/1 is wide open letting lots of light in and F/16 is stopped down to a tiny opening letting hardly any light in. Film ISO is how sensitive the film is to light ISO 100 and 200 are good for outdoor daylight shooting, 400 is good all purpose film, 800 and 1600 are low light film good for indoors and night time shots.
On your camera you also have a F/Stop setting, that one is only used for calculating depth of field (DOF) and has no direct link to how bright your rendered scene will be.
Photometrics are on, I boosted the lumens. That's different from before. I'm not really a Daz user, more of a writer that find Daz useful when I can figure it out. :)
Before using the light's brightness seemed to work. It COULD have been more coincedence, something else I was doing, but not the brightness like I thought. My new render is looking buch better, not where near as dark as before. I'll post it here when It's done.
@JamesJAB "IMPORTANT SETTINGS THAT PEOPLE OVERLOOK OR DON'T KNOW ABOUT!"
You missed a significant point. Those settings are only going to change the render look. They won't change render time or render noise.
Too many people seem to think that brightening the scene with tone mapping is the same as using more lights/ more intense lighting. It's not.
Well, lets have a look and see if the noise is down.
Hopefully the order stays the same, but they are labeled, Desktop screencap, my workspace view, followed by desktop test, the render. Follows is Laptop screencap, and laptop test. Then desktop test 2 after I appled the lumen setting mentioned above.
The noise is mostly on my laptop. Not a desparately strong processor, so OK. I can see that. The computer is a video heavy gaming computer. It doens't look too bad, no or very little noise, just dark. the last looks much better. Still somewhat dark, but clearer.
Thoughts?
Here are my findings from a controlled environment test. You are right on some points but did not take into account that the tone mapping settings can increase the convergence per itteration. While you will still spend the same amount of time per itteration, you will be closer to 100% convergence.
Quadro K5000M 4GB, Memory usage during renders = 1454MB
Room x20ft z20ft y10ft (Iray -> Daz Uber -> "Rubber - Matte" Shader
Light 6Ft tall (4 inch emissive sphere 4500k temperature inside of a 14 inch frosted glass sphere)
Object Default Skin shader 8Ft from light
Render 1
100w Bulb @ 100% Efficiency
Shutter 1/128
F/Stop 8.0
ISO 100
Render Time to 2138 itterations : 6:55
Render 2
100w Bulb @ 100% Efficiency
Shutter 1/60
F/Stop 4.0
ISO 200
Render Time to 2138 itterations : 6:52
Render 3
100w Bulb @ 100% Efficiency
Shutter 1/30
F/Stop 2.0
ISO 400
Render Time to 2140 itterations : 6:53
Render 4
100w Bulb @ 100% Efficiency
Shutter 1/30
F/Stop 2.0
ISO 1600
Render Time to 2140 itterations : 6:55
Convergence : 0.48%
This is the first of these renders with enough light getting to the canvas to generate Convergence numbers
Render 5
300w Bulb @ 100% Efficiency
Shutter 1/30
F/Stop 2.0
ISO 1600
Render Time to 2140 itterations : 6:54
Convergence : 0.65%
As you can see here, the more light that gets to the canvas the less passes it will take to reach 100% convergence. The end result being a better looking render in less time.
Render 6
1000w Bulb @ 100% Efficiency
Shutter 1/60
F/Stop 2.0
ISO 6400
Render Time to 1.58% Convergence : 16:01
Itterations : 5000
Convergence @ 2140 Itterations = 0.80% (Time = 6:53)
In this last render I have bumped the ISO up two settings, shortened the shutter a step, increased the light to 1000w and will let it go to 5000 Itterations.
The big takaway here is that more light getting to the canvas translates to higher convergence percent per itteration. The higher your convergence is at the end of a render, the less noise will reamain in your image.
The amount of light will not change the time that the GPU takes per itteration, but it will generate higher quality itterations in the same time.
It doesn't look like I'm getting much noise on the desktop. I'll upload a few other rendered shots.
Test 3 is after I adjusted the brightness/contrast/saturation in Paint.net (Free and very functional). Test 4 is the 'pencil drawn' effect in same. The last is a 'finished' peice for the comic/online graphic novel I'm using daz to help create.
In the last one I'm only rendering the model and using sketchup for the background. I may go back and re render the backgrounds, but I haven't decided. While the middle example looks great, the work flow it way too slow.
On a side note, I want to thank everyone for chiming in to help. I have high hopes for this lil' sci fi drama of mine and really want it to succeed.
@JamesJAB
What setting is the 100% Efficiency coming from? If you mean the Luminous Efficacy that is the Lumens per Watt coming from the light source. It is based on real world lights and Efficiency is something completely different. The default when using an Emissive surface is 15 which is for an Incandescent Bulb.
https://en.wikipedia.org/wiki/Luminous_efficacy#Lighting_efficiency
I set the emissive surface setting to 100% efficiency because at 15% in Iray you need to use crazy high wattage numbers unless you use a tiny emissive surface. If I built the internal components for the light bulb and illuminated the filament, 15% would probably work fine.
I see, so it is 'your world' settings not 'real world' settings. Thank you. I use the Efficacy and Watts settings for the bulb I am using and set the Tone Mapping for the light produced. It works for me.
Oh... lol I was typoing the whole time.
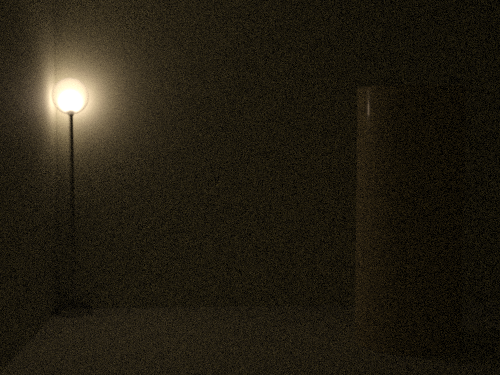
Well I went and built a mock light bulb to test my theory about the emissive surface size, and all I learned was that the default "frosted glass" Iray shaders do not transmit light very well. After ditching the frosted glass in favor of solid clear dispursive I came up with a nice little render showing my lightbulb and lamp made of primatives in action.
@JamesJAB "Here are my findings from a controlled environment test. " "15% in Iray you need to use crazy high wattage numbers unless you use a tiny emissive surface"
Your test wasn't very controlled. My response was about adding more physical lighting sources to speed up a render. That's exactly what you did after render 4, and why the first 4 renders show effectively no difference in time or (effectively) no difference in noise.
To add to Fishtales discussion, bear in mind that Luminance (the setting for emissive surfaces) is luminous intensity per unit area, so actually it's the tiny surface that needs "crazy" high numbers. You can change the geometry of emissive and photometric lighting device.
People seem to get confused and/or frustrated because Studio's (and perhaps Nividia's) Iray implementation requires Luminous Flux values that they believe are unrealistic. There are a couple of points worth considering here. First, Studio uses a "camera" to render an image (even if you render the viewport). For a camera, 100 watts isn't very bright unless you bump the ISO very high. Point being you aren't rendering what you eyes would see, but what a camera would see, thus the Tone Mapping settings. Secondly, does it really matter how many lumens get assigned to a light source? At the end, the render is adjusted to match the artist's vision of the scene.
Pointing at the highlighted area of your statement. If you look at my render in the post directly above, it contradicts that statement. All of the light in the scene is being generated by that tiny little 0.2mm x 2cm cylinder set as emissive (100w at 15% Efficacy) with Tone mapping settings at ISO 100, 1/60 shutter, and F/1.4. From what I've found the total amount of light power is distributed across the surface area.
A lot of that's going over my head. Anyway, I have a usable render now. Thanks everyone.