Reverse Source from Target broken in DAZ 4.9?
 Rezzer
Posts: 10
Rezzer
Posts: 10
Hello
It's been a while since I've tried the Transfer Utility to rig clothing to figures that aren't the base Genesis 3 figure. The last time I did this was on DAZ 4.7 and all I had to do was select "Current Shape" and "Reverse Source from Target" and it all worked pretty well. But if I do the same on DAZ 4.9, I get large distortions in the geometry after rigging:
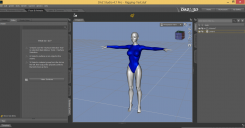
1. Load the OBJ modeled for custom shape figure (note the version says "DAZ 4.7 Pro"):
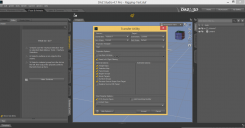
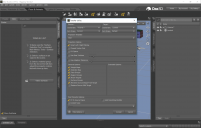
2. Use the Transfer Utility (note that "Item Shape: Current" and "Reverse Source from Target" are selected):

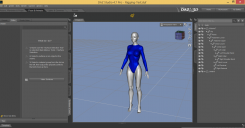
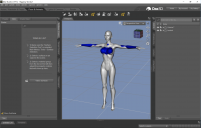
3. The rigged figure fits the custom shape very well:


But if I repeat these same steps on DAZ 4.9, the geometry of the rigged figure gets distorted:
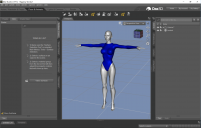
1. Load figure (note the version says "DAZ 4.9"):

2. Transfer Utility. Select "Item Shape: Current", "Reverse Source from Target". All the other parameters are the same as in DAZ 4.7:

3. Observe the large distortions in the geometry:

Am I doing something wrong? What else should we do to rig clothing to custom shapes in DAZ 4.9?


Daz 3D is part of 
Connect
DAZ Productions, Inc.
7533 S Center View Ct #4664
West Jordan, UT 84084
Licensing Agreement | Terms of Service | Privacy Policy | EULA
© 2025 Daz Productions Inc. All Rights Reserved.
Comments
Is there scaling as well as morphing on the figure?
I think it seems broken. I remember, current option work with reverse defomation, even though I mix some morphs.
now I test with genesis2female with mix morphed, and target as simple mesh generate body suit,
set source = current, with reverse defomation not work, it applied all morphs again from current shape, when fit to.
I test without reverse defomation, it generate same mesh. (double deformed)
then source as ”morph” (maybe clone work too) option work with reverse defomation as same as before.
that means, we can choose only one moprh. or need to make shape as clone for mix shape, If you use this option with current daz studio.
I test with official build, but current pulbic build beta is same, then may no need test with beta.
Kitakoredaz was right, and thanks to him I was able to find a workaround for this issue. I'll post a more detailed solution later; but here's the gist of it:
1. Load Genesis 3 Base and dial-in your custom character (in my case, this involved about 20 different dials from various morphs and vendors).
2. Save the current Shape Preset for later and model your clothing on this custom shape.
3. Set the resolution of your Genesis 3 figure to Base, Subdivision to 0 and export it as an OBJ file at 100% scale. We're going to create a morph from this OBJ.
4. Reset the shape of Genesis 3 to 0, it should look like the base figure again.
5. Use Morph Loader Pro and the OBJ created in step 3 above to create a morph for Genesis 3. Remember the name of this morph for later.
6. Dial the morph created in step 5.
7. Reset the figure to High resolution and subdivision level to 1 (or whatever it was when you modeled your clothes).
8. Load your clothes. They should fit your morphed figure.
9. Use the Transfer Utility to rig the clothing: In "Item Shape" select "Morph" and then select the morph you created on step 5 above. Also enable "Reverse Source Shape from Target".
10. Select the projection template (if applicable).
11. Run the transfer utility. Your clothes should now be rigged without distortion on the morphed figure and they should be usable now. If this is all you wanted, then you're done!
Side note: sometimes this step will create minor distortions in certain areas. At this point you might want to use the Morph Loader Pro again on the rigged clothing and load the original, un-rigged OBJ of the clothing to create a morph. Yes, what I'm saying is this: create a morph that transforms the rigged clothing back to its original modeled shape. This should eliminate all minor distortions that may have been created by the transfer utility.
12. Optional: delete the morph created in step 5 or simply reset the shape of Genesis 3 again so that it looks like the base figure (the rigged clothing should also follow this change so that it fits Genesis 3 Base), then load the Shape Preset you created in step 2 above. The rigging should now work on your Custom Shape. This has the additional advantage that you may continue to refine and tweak the Custom Shape to your liking and the rigged clothing should continue to work (to within reasonable limits).
These steps worked for me. However, I don't think the end user should jump through hoops just to get the same funcionality we had with a couple of clicks 2+ years ago. I think a bug should be filed to fix this.
Yes those step have been used, (And I know it work ) though I usually save as clone about current mix morphed shape when I use reverse defomation option, (because Clone have no concern about scale proplem etc, and find it easy ,when you aplly "soruce as clone" option. it may not different from your way, make one " temp FBM" for TU.
I usually model clothing first for zero shape figure, then keep the clothing obj in my 3d aprication, later make it fit to my actor shape, sometimes you may hope to overwrite auto-generated morph individually.
Then it has been recommeded for long time, even though we model clothing for morphed shape, at first transfer weight and rig to clothing with zero base figure. not morphed figure. Though there is auto-reverse option, most of case we need to re-modify and tweak a little for zero base shape. (because auto-reverse process not work perfect, it aproximately reverse and remove generated morph from Clothing to zero shape)
I really like merge many morphs for body or head , then usually I hope to re-shape clothing for each actor shape . then may not plan start with morphed shape, without I concentrate one actor shape, and hope to make best fit item for the Actor. (but I tweak body morphs frequently,,,,)