DForm + Face = Sad
 JamesJAB
Posts: 1,760
JamesJAB
Posts: 1,760
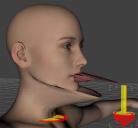
Is there any way to keep DForms from influencing the inside of the mouth, and tongue? I could have sworn there was a way to choose which body parts are effected.
I am using Genesis 3 Female and Daz Studio 4.9.3.166 Pro.
Here is quick and dirty screen cap of the type of problem I'm having
DForm.jpg
900 x 835 - 57K
Daz 3D is part of 
Connect
DAZ Productions, Inc.
7533 S Center View Ct #4664
West Jordan, UT 84084
Licensing Agreement | Terms of Service | Privacy Policy | EULA
© 2025 Daz Productions Inc. All Rights Reserved.
Comments
I think what you need to do is use weight maps with the D-former and then lock certain areas with the Geometry Tool. See this discussion:
https://www.daz3d.com/forums/discussion/61613/isolating-masking-or-limiting-painting-weights-with-dformer
I have read that thread and I dont think the "lock polygon selection" method suggested from richard is that easy.
I use another method I would call Fill Selected with a value of 0% for such situations that I like to descripe:
1. select the DFormer Influence Field go to Parameters>Influence>Influence Mode and switch it from Sphere to WeightMap now all deformations dissapear but dont worry
2. switcht to the Node Weight Map Brush Tool and open the Tool Settings Pane with the Influence Sphere still selected
3. in the Tool Settings here is a dropdown menu Unused Maps with the Influence Weights click the button Add Map next to it and now the DFormer deformation will show up again on the figure but now it is controlled by the Weight Map paint you see on the figure
4. switch to the Geometry Editor Tool and select all polygons you dont want to deform, therefore its maybe the best to select all the surfaces groups and add them to the selection with the plus sign next to it - this will be all surfaces fom the eyes like Cornea, Eye Reflection, Teeth, Gum maybe the tongue ect. (If you plan to add more DFormers on the Head you better save that selection - right-click Selection Sets > Create Selection Set From Selected)
5. go back to the Node Weight Map Brush Tool and use Fill Selected with a value of 0% - this is done by the right click menu on the viewport Weight Editing > Fill Selected set it to 0% hit Accept - done - the selected polygons are no longer affected by the DFormer
The good thing about this is that you can now use the Smoth Brush and paint a nice trasition in your case especialy to the lips to avoid harsh distortions. Maybe use Respect Selection in Tool Settings - or you press Ctrl+[Numpad+] or [Numpad-] to grow / shrink the selection - right click the Viewport again and select Weight Editing > Smooth Selected to get an overall evenly smoothed weight paint transition.
That's a clever solution!